Why Tahdig Turns Shatter-Crisp, Pale, or Stubbornly Stuck: Starch Gelation, Steam Management, and the Pot Rules Behind Persian Crispy Rice
RecipeSimpli
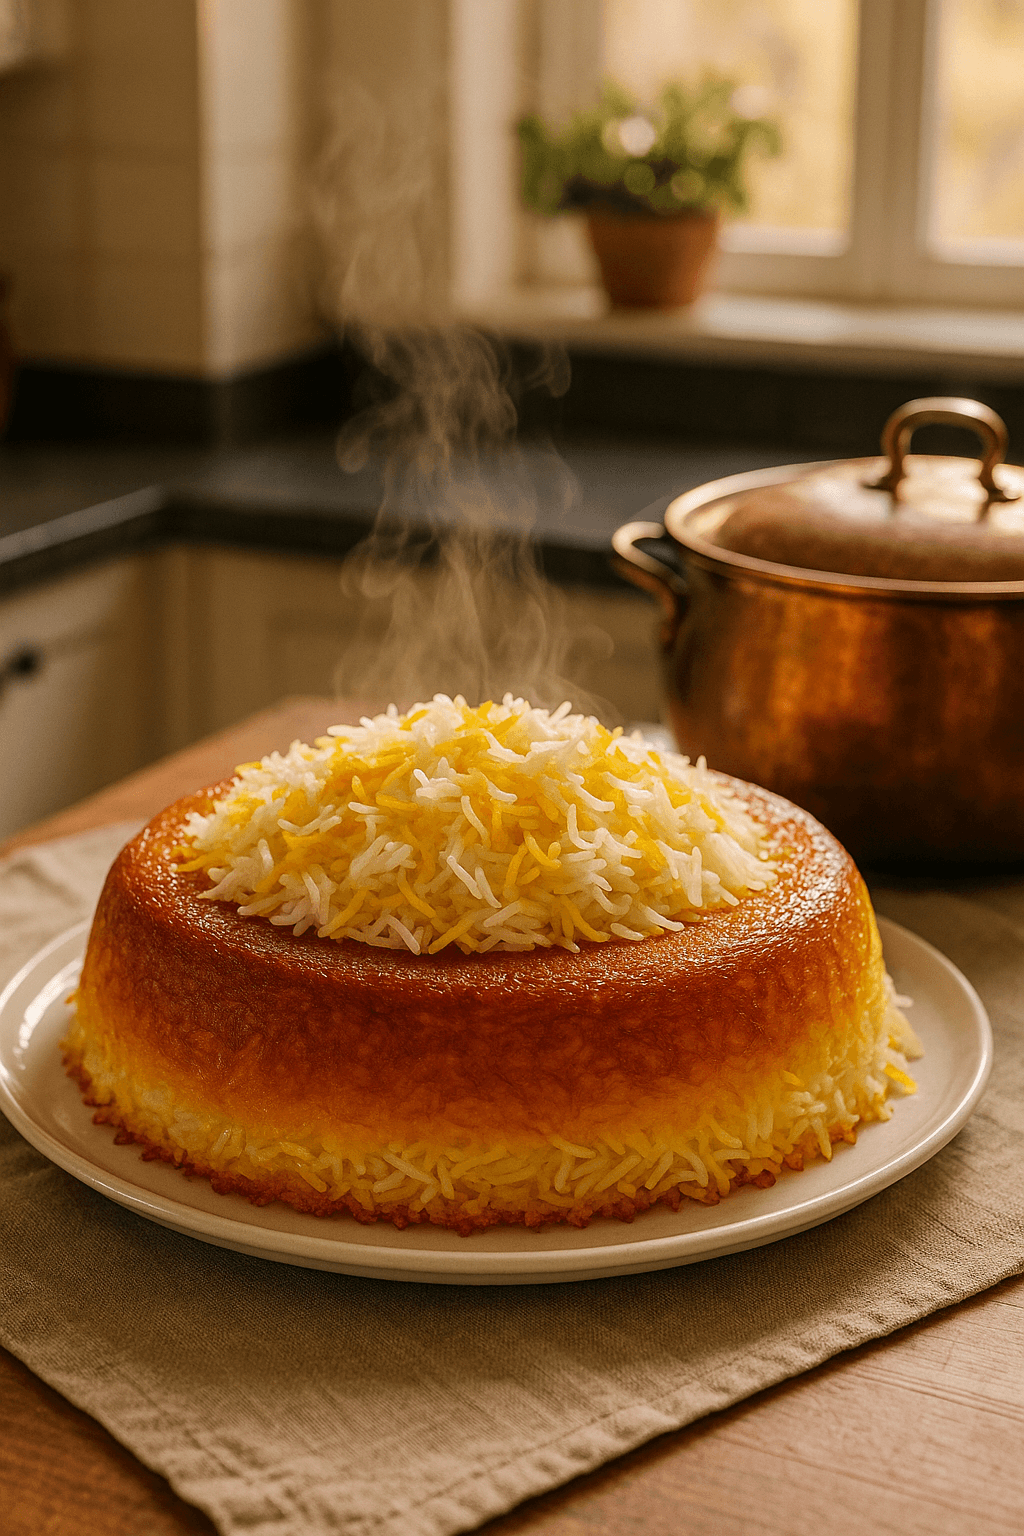
There are few kitchen moments more dramatic than turning out a pot of tahdig. You invert the rice onto a platter, lift the pot, and wait for the reveal: ideally a lacquered, golden crust that comes away in one glorious piece, crackling at the edge of the spoon. When it works, tahdig feels like culinary magic. When it doesn’t, it can be maddeningly specific in its failures. The crust stays pale and soft instead of bronzed and brittle. It glues itself to the bottom of the pot. It burns before the rice above has fully steamed. Or it breaks apart into delicious but disappointing shards.
Tahdig is often translated loosely as “crispy rice,” but that simplification misses both the technique and the cultural meaning. In Persian cooking, tahdig is not an accidental byproduct of rice left too long on the stove. It is the treasured crust formed intentionally at the bottom of the pot during the steaming of chelow or polow. It can be made from rice itself, from sliced potatoes, from lavash or other thin flatbread, and sometimes from lettuce leaves or other ingredients depending on the dish and household tradition. It is both centerpiece and prize: the part everyone notices, negotiates over, and remembers.
To understand why tahdig succeeds or fails, it helps to stop thinking of it as a single event and instead see it as three processes happening at once. First, the rice is partially cooked through parboiling, which sets up the grains for later steaming and controls how much starch is available on the surface. Second, the pot environment traps steam so the upper rice can finish gently without becoming wet or compacted. Third, the bottom layer fries, dehydrates, and browns in fat while still being buffered by moisture from the rice above. Great tahdig depends on balancing these processes so that the bottom gets hot enough long enough to crisp and color, but not so aggressively that it burns or welds itself to the pot.
That balance comes down to a handful of variables: how thoroughly the rice is washed, whether and how long it is soaked, how far it is parboiled, how well it is drained, how much oil or butter is used, how the rice is mounded, what kind of lid traps or sheds condensation, how the heat is staged, and what the pot is made from. Each step changes the physics and chemistry of starch gelation, steam movement, surface dehydration, and release.
Tahdig in context: more than a crunchy bottom
The word tahdig comes from Persian: tah meaning bottom and dig meaning pot. In the Iranian rice tradition, long-grain rice—often basmati or Persian rice varieties—is commonly washed, soaked, parboiled, drained, and then steamed to finish. This method is distinct from simpler absorption-style rice cooking because it gives the cook more control over texture. The grains above remain long, separate, and fluffy; the bottom develops its prized crust.
That crust has social weight. A pot of rice can be excellent, but the tahdig is what draws admiration. Families may have strong loyalties to one form over another: rice tahdig, potato tahdig, bread tahdig. Saffron, yogurt, egg yolk, or a bit of the parboiled rice may be mixed for color and flavor in the bottom layer. Some cooks swear by butter for aroma, others by neutral oil for reliability, others by a blend. Techniques vary across homes, regions, and dishes, but the governing principles remain surprisingly consistent.
This matters because tahdig is sometimes flattened into internet-friendly “crispy rice hacks” that ignore the logic of Persian rice cookery. A generic tip like “just press cooked rice into an oiled pan” may create something crisp, but it does not explain how tahdig forms during steaming or why parboiling and draining are essential to the classic texture. If you want Persian-style tahdig rather than simply browned rice, the method begins long before the pot hits the burner.
The texture equation: what you are really building
At its best, tahdig has four qualities at the same time:
- Deep golden color rather than pale ivory or dark brown.
- Crisp structure that shatters or snaps instead of bending.
- Cohesion so it can lift out in large pieces or one disk.
- Clean release from the pot with minimal sticking.
These qualities sound like one thing, but they come from different causes.
Color comes from a combination of dehydration, starch browning, and in some cases proteins or sugars from added yogurt, bread, or potatoes. Crispness comes from moisture loss and the setting of gelatinized starch in the presence of heat and fat. Cohesion comes from enough starch bonding in the bottom layer to knit grains together, but not so much loose starch that the whole thing turns gluey. Clean release depends on adequate fat at the interface, suitable pot material, and not scorching beyond the point where starches and proteins carbonize onto the surface.
When your tahdig is pale, you usually have enough moisture and not enough bottom heat or time for significant dehydration and browning. When it sticks, you often have too little fat, too much exposed starch, poor pot choice, or heat so high that the bottom carbonizes and adheres. When it burns, the bottom is getting more energy than the moisture flow from above can moderate. When it falls apart, the grains may have been too dry or too separate in the bottom layer, or the crust may have been underdeveloped and fragile.
The rice science: washing, soaking, and parboiling
Washing: removing excess surface starch without stripping the rice of all possibility of bonding
Raw milled rice carries loose starch dust on its surface. During cooking, this starch hydrates quickly, sloughs off, and can turn the cooking water cloudy and sticky. For tahdig, washing is especially important because excess loose starch at the bottom of the pot increases the risk of gumming and sticking. It can form a paste that glues the rice to the pot before a proper crust develops.
Wash the rice in several changes of cool water until the water goes from cloudy to mostly clear. For 3 cups / about 600 g long-grain rice, this usually takes 4 to 6 rinses. Use your hand to gently agitate the grains, but do not mash or fracture them. Broken grains release more starch and cook unevenly.
The goal is not a laboratory-perfect rinse. You are reducing free surface starch, not sterilizing the rice of all starch. Some starch release later is useful because it helps the bottom layer set into a cohesive crust. But you want that starch release to happen in a controlled way during parboiling and steaming, not all at once as a gummy sludge at the pot bottom.
Soaking: hydration for even cooking and grain length
Soaking long-grain rice before parboiling is a standard Persian practice with both practical and textural benefits. A soak of 30 minutes to 2 hours in salted water hydrates the outer layers of the grain, helping the rice elongate and cook more evenly during the brief parboil. It also reduces the risk that the outside overcooks before the center is ready.
A good home-kitchen rule is:
- 3 cups / 600 g long-grain rice
- Cover with plenty of cool water
- Add 2 to 3 tablespoons kosher salt or 1 to 1 1/2 tablespoons fine salt
- Soak at least 30 minutes, ideally 1 to 2 hours
The salted soak seasons the rice lightly and influences water uptake. A well-soaked grain is less likely to split during the parboil and more likely to finish with the prized separate, elongated texture. If you skip soaking, tahdig is still possible, but your timing window narrows. The parboil becomes less forgiving, and the top rice may steam unevenly.
Parboiling: the critical stage most often misunderstood
Parboiling is where the interior starch of the grain begins to gelatinize. Starch granules absorb water and swell as temperature rises, typically beginning around 60–70°C / 140–158°F depending on the rice. By the time the rice is boiled in abundant water, the outer zones of the grain soften first while the center remains firmer. This partial gelatinization is exactly what you want.
For tahdig, the rice should be parboiled until the grain is tender on the outside but still distinctly firm in the core. A common Persian test is to bite a grain: the outside should be soft, but the center should show a chalky or opaque line. In practical terms, after soaking and draining, boil the rice in a large pot of generously salted water for about 5 to 8 minutes, depending on the rice variety, age, and soaking time.
Signs you are in the right zone:
- The grains have lengthened noticeably.
- The exterior tastes mostly cooked.
- The center still offers resistance.
- The grain does not collapse into mush when pressed.
Why this matters for tahdig:
- Under-parboiled rice may not steam through properly later, and the bottom may burn while the upper rice is still too firm.
- Over-parboiled rice releases too much starch, becomes fragile, and can compact in the pot, leading to a dense top and a crust that sticks or turns greasy rather than crisp.
Once drained, the rice continues to carry heat and some residual moisture, but not enough liquid to simmer. That separation between hydrated grains and free water is key. Tahdig is a steam-finish method, not an underwater cooking method.
Draining and drying: why “not too wet” matters so much
After parboiling, drain the rice thoroughly in a colander. Some cooks rinse briefly with lukewarm water to stop carryover cooking and wash away more starch; others avoid rinsing to preserve flavor and warmth. Either approach can work, but if your tahdig tends to stick, a light rinse may help reduce excess starch on the surface of the grains. If your rice tends to feel too cool and takes forever to steam, skip the rinse.
What matters most is that the rice drain well for at least 2 to 5 minutes. You do not want puddles of water traveling into the pot with the rice. Free water is the enemy of rapid crust formation. At the bottom of the pot, water keeps the temperature pinned near the boiling point until it evaporates. Oil can climb above that, but only if it is not diluted and displaced by excess water. A soggy load of rice delays browning, leading to pale tahdig and a longer cooking time that can paradoxically increase sticking later.
Think of the bottom layer as needing two contradictory things: enough moisture nearby to gelatinize and bind starches, but not so much free water that it stews instead of fries. Proper draining is what threads that needle.
The fat layer: lubrication, heat transfer, and flavor
Fat is not just there to prevent sticking. In tahdig, it performs three separate jobs:
- It coats the pot bottom, reducing direct starch-to-metal adhesion.
- It transfers heat efficiently into the bottom layer, helping it crisp and brown.
- It contributes flavor and mouthfeel.
For a standard 10-inch / 25-cm pot holding 3 cups / 600 g dry rice, a reliable starting amount is 1/4 cup / 60 ml fat total at the bottom, sometimes split between oil and butter. This may sound generous, but tahdig is a celebratory dish, not a low-fat one.
Which fat works best?
- Neutral oils like grapeseed, sunflower, avocado, or other refined oils are dependable because they tolerate heat and maintain a slick interface.
- Butter adds wonderful flavor but contains milk solids that brown and eventually burn. On its own, butter can work over moderate heat, but it is less forgiving.
- A butter-oil blend gives aroma plus stability and is a favorite compromise.
- Clarified butter or ghee is excellent: buttery flavor with higher heat tolerance.
A classic home-kitchen approach is 2 tablespoons neutral oil + 2 tablespoons butter or ghee for a smaller batch, scaled upward for a larger pot.
Too little fat increases sticking and patchy browning. Too much fat can make the crust greasy and fry the bottom too aggressively before the upper rice finishes steaming. The right amount creates a thin, even lubricating layer, not a deep pool.
Building the pot: bottom layer, mounding, and steam channels
Once the pot is heated lightly with the chosen fat, some cooks add a spoonful or two of saffron water and a small amount of parboiled rice mixed with yogurt or egg yolk for color and cohesion. Others add plain rice directly. Potato or bread versions are arranged before the rest of the rice goes in.
If making rice tahdig, it helps to reserve 1 to 1 1/2 cups of parboiled rice and optionally mix it with:
- 2 tablespoons yogurt
- 1 tablespoon oil or melted butter
- 1 to 2 tablespoons bloomed saffron water
- Optional: 1 egg yolk for richer color and stronger setting
This mixture encourages a more unified, beautifully colored crust because yogurt and egg add proteins and solids that brown readily and help the base bind. It is not mandatory, but it is useful, especially for cooks struggling with pale or fragile tahdig.
The rest of the rice should go into the pot in a loose mound rather than being packed down hard. Use the handle of a spoon to poke 5 to 7 holes down toward the bottom. These vents allow steam to rise through the rice rather than condensing randomly and turning patches soggy.
Why not compress the rice? Because packed rice reduces steam circulation and can create a dense mass where moisture redistributes poorly. The top may seem dry while the lower layers stay too wet. Loose grains and steam channels support even steaming above and controlled crisping below.
Towel-under-lid steaming: the quiet genius of condensation control
One of the defining techniques in Persian rice cookery is wrapping the pot lid with a clean kitchen towel before covering the pot. The towel should be secured so it cannot hang near the burner. This is not a decorative move. It solves a real moisture problem.
As steam rises and hits the cooler lid, it condenses into water. Without a towel, those droplets gather and fall back onto the rice. Dripping condensation rewets the surface and can trickle down the sides, making the upper grains clammy and the lower crust patchy. The towel absorbs this moisture before it can rain back into the pot.
From a science perspective, the towel improves the internal moisture gradient. Steam still cooks the rice, but excess liquid water is removed from the loop. That means the bottom can continue drying and crisping while the top finishes steaming in a humid, not wet, environment.
If you have ever had tahdig that browned unevenly while the rice above felt strangely damp, poor condensation management may have been the culprit.
Heat staging: the difference between pale and golden, or golden and burnt
Tahdig is not made over one constant heat level. It benefits from stages.
Stage 1: Set the sizzle
Once the fat and bottom layer are in the pot and the rest of the rice is mounded, place the covered pot over medium heat for about 5 to 10 minutes. You want to hear a gentle frying sound begin. This stage initiates crust formation at the bottom before the lid traps too much moisture overhead.
Stage 2: Steam gently
Reduce to low heat and cook for 30 to 45 minutes for a typical 3-cup batch, sometimes longer depending on the pot, rice, and heat source. During this phase, the upper rice finishes cooking through steam while the bottom slowly dehydrates and browns.
Optional Stage 3: Brief finishing heat
If, after the steaming time, you suspect the tahdig is still too pale, a 2 to 5 minute increase to medium-low can deepen color. This is useful, but risky if your pot runs hot. Listen and smell. If the aroma turns sharply toasted or acrid, back off immediately.
Why low heat works better than many people think: the bottom of the pot remains in a delicate equilibrium. Moisture from the rice above migrates downward and outward, buffering temperature spikes. If the flame is too high, the fat layer can exceed the safe crisping range and scorch the starch before enough water has left the crust. Scorched starch sticks tenaciously.
The pot rules: material, thickness, and shape
Tahdig is unusually sensitive to cookware because the entire success of the crust depends on how heat is delivered at the interface.
Best choices
- Heavy-bottomed nonstick pots are the most forgiving for home cooks. They reduce adhesion and make release easier.
- Well-seasoned, thick pots can work beautifully if you know their heat behavior.
- Enameled pots are possible but can be stickier, especially if the heat is not carefully managed.
Trickier choices
- Thin stainless steel is unforgiving. Hot spots cause patchy browning and stubborn sticking.
- Bare stainless can work in expert hands with enough fat and excellent heat control, but it is not ideal for beginners.
- Cast iron holds heat strongly and can brown very aggressively. It is possible, but easy to overdo.
Pot shape matters too
A pot with a reasonably broad base gives more tahdig surface area and more even browning. If the pot is too narrow and deep for the amount of rice, the bottom may overcook before steam penetrates the upper mass. If it is too wide and shallow, the rice layer may be too thin to steam properly.
For 3 cups / 600 g dry rice, a 9- to 10-inch / 23- to 25-cm pot is a comfortable target.
The ideal pot bottom stores and spreads heat evenly. Tahdig likes consistency more than intensity.
Why tahdig turns pale
A pale tahdig usually means the crust formed but did not dehydrate or brown enough. Common causes include:
- Too much residual water after draining the rice
- Heat set too low from the very beginning
- Not enough total cooking time
- Too much steam condensation dripping back into the pot
- Insufficient fat at the bottom
- A very heavy pot on a weak burner that never gets the base hot enough
Fixes
- Drain parboiled rice more thoroughly.
- Start with a short medium-heat phase before lowering.
- Use the towel-under-lid method.
- Increase bottom fat modestly.
- Extend low steaming by 10 minutes, then check.
- Add a saffron-yogurt rice layer at the bottom for better color.
Remember that pale does not always mean undercooked. Sometimes the crust is crisp but blond because browning lagged. In that case, a brief finishing boost in heat may solve it.
Why tahdig sticks
Sticking is usually a combination of adhesion and scorching.
Common causes
- Too little fat on the pot bottom
- Excess loose starch from insufficient washing or overcooked parboil
- Pot material that grips starch strongly
- Heat too high, causing carbonized patches
- Attempting to unmold immediately without a brief rest
- Inadequate crust development, so the bottom tears instead of releasing
The science of sticking
When starch gelatinizes, it becomes sticky by design. If that starch is pressed directly against a hot metal surface with little lubrication, it can bond mechanically and chemically. As water leaves, the starch matrix hardens. If it also scorches, the bond becomes even stronger. Nonstick coatings reduce this interaction. Fat inserts a barrier layer. Controlled heat allows the crust to set before it burns into the pot.
Fixes
- Wash rice until nearly clear.
- Avoid over-parboiling.
- Use 1/4 cup / 60 ml fat for a standard batch as a baseline.
- Choose a better pot.
- Keep the long steaming phase on low.
- Rest the pot off heat for 5 minutes before unmolding.
- If needed, set the pot briefly on a damp towel or shallow tray for 10 to 20 seconds to encourage release through slight thermal contraction.
That final trick works because as the pot cools just a bit, the crust and metal contract at different rates, loosening the interface.
Why tahdig burns before the rice is done
This is usually a heat-management problem, though rice thickness and pot geometry contribute.
Causes
- Flame too high after the initial setup stage
- Thin pot with poor heat diffusion
- Too little rice in too large a pot
- Not enough soaking or too-short parboil, so upper rice needs too much steaming time
- Too little moisture retained overall
Fixes
- Lower the heat sooner.
- Use a flame tamer if your burner runs hot.
- Match pot size to rice quantity.
- Soak and parboil properly so the top finishes in time.
- If the rice seems dry during assembly, drizzle 2 to 3 tablespoons of melted butter or hot water over the mound before covering.
Tahdig is not a race. The ideal crust forms while the rest of the rice quietly comes to doneness.
A reliable master method for rice tahdig
Here is a dependable baseline method for home cooks.
Ingredients
- 3 cups / 600 g long-grain basmati or Persian-style rice
- Water for washing, soaking, and boiling
- 2 to 3 tablespoons kosher salt for soaking, plus more for boiling water
- 1/4 cup / 60 ml neutral oil, ghee, or a mix of oil and butter
- Optional saffron: 1/4 teaspoon ground saffron bloomed in 2 tablespoons hot water
- Optional bottom-layer enrichment:
- 1 cup parboiled rice
- 2 tablespoons plain yogurt
- 1 tablespoon oil or melted butter
- 1 egg yolk
- saffron water
Step 1: Wash
Rinse the rice in cool water 4 to 6 times until the water is mostly clear.
Step 2: Soak
Cover the rice with cool water and salt. Soak 1 hour if possible.
Step 3: Parboil
Bring a large pot of water to a rolling boil. Salt it generously so it tastes well seasoned. Drain the soaked rice and add it to the boiling water. Boil 5 to 8 minutes, checking frequently. Drain when the grains are soft outside and firm in the middle.
Step 4: Drain well
Let the rice sit in the colander 2 to 5 minutes.
Step 5: Prepare bottom layer
Heat a sturdy nonstick pot over medium for 1 minute. Add the fat. If using the enriched layer, combine the reserved rice with yogurt, oil or butter, egg yolk, and saffron. Spread this mixture over the bottom. Otherwise, add a plain layer of rice.
Step 6: Add remaining rice
Pile the rest of the rice into the pot in a loose mound. Poke several steam holes with the handle of a spoon. Drizzle a little saffron water or melted butter over the top if desired.
Step 7: Cover with towel-wrapped lid
Wrap the lid with a clean towel and secure it safely. Cover the pot.
Step 8: Heat stage
Cook over medium heat 5 to 10 minutes, until you hear gentle sizzling. Reduce to low and steam 30 to 45 minutes.
Step 9: Rest
Remove from heat and let rest covered 5 minutes.
Step 10: Unmold
Run a thin spatula around the edges if needed. Invert onto a platter. If stubborn, set the pot briefly on a damp towel, then try again.
Potato tahdig: why it behaves differently
Potato tahdig is beloved for its dramatic appearance and rich, crisp bite. But it follows slightly different rules because potatoes bring more water, more sugar, and different starch behavior than rice.
Use waxy-to-all-purpose potatoes or a balanced variety such as Yukon Gold. Slice them 1/8 inch / 3 mm thick. Thicker slices may stay soft in the center before the exterior crisps; paper-thin slices can fuse and burn.
Coat the pot bottom generously with oil, then arrange the potato slices in a single overlapping layer. Season lightly with salt. Some cooks let the potatoes fry alone for 2 to 3 minutes before adding the rice, but this depends on the pot and heat.
Science notes for potato tahdig
- Potatoes contain more water than parboiled rice, so they need enough time to drive off moisture.
- Their natural sugars can brown faster than rice, so color comes earlier.
- If the slices are crowded or wet, they steam and remain blond.
- If the heat is too high, the starches and sugars burn before the centers fully cook.
A moderate start and patient low steaming remain essential. Potato tahdig often releases beautifully if enough oil is used and the slices are arranged evenly.
Bread tahdig: the easiest path to reliable crispness
Lavash or other thin flatbread tahdig is often the most forgiving for beginners because the bread creates a physical barrier between rice and pot. It browns predictably, protects against sticking, and absorbs flavored fat wonderfully.
Brush the bottom of the pot with generous oil or melted butter, line it with lavash, and let the bread climb slightly up the sides if desired. Add the rice mound and steam as usual.
Why it works so well
- Bread contains less free moisture than rice or potato, so it crisps readily.
- Gluten and baked structure provide mechanical integrity.
- The starch-protein matrix browns attractively and releases more easily than rice alone.
The risk with bread tahdig is scorching if the heat is too high, especially with thin lavash. But if your rice tahdig repeatedly sticks, bread is an excellent confidence builder.
Common mistakes and how to prevent them
Mistake: Washing inadequately
Result: sticky rice, gummy crust, more adhesion.
Fix: rinse until mostly clear.
Mistake: Over-soaking for many hours at room temperature
Result: overly fragile grains, off flavors in warm kitchens.
Fix: stick to 30 minutes to 2 hours, or refrigerate if longer.
Mistake: Over-parboiling
Result: compacted rice, broken grains, greasy or sticky tahdig.
Fix: drain while the center still has bite.
Mistake: Packing the rice down hard
Result: poor steam circulation, dense texture, uneven crust.
Fix: mound loosely and poke vents.
Mistake: Skipping the towel under the lid
Result: wet top, pale or patchy bottom.
Fix: always wrap the lid securely.
Mistake: Using high heat throughout
Result: burnt bottom, understeamed top.
Fix: short medium start, long low finish.
Mistake: Choosing the wrong pot
Result: hot spots, sticking, inconsistent browning.
Fix: heavy-bottomed nonstick or another even-heating pot you know well.
Mistake: Unmolding in a panic
Result: broken crust.
Fix: rest 5 minutes, then invert confidently.
The subtle role of salt, saffron, yogurt, and egg
These additions may seem secondary, but they affect both flavor and crust behavior.
- Salt seasons the rice and slightly influences water movement during soaking and boiling.
- Saffron brings color and aroma; while not a major browning agent itself, it visually amplifies golden tones.
- Yogurt adds milk solids and acidity, encouraging richer color and a cohesive crust.
- Egg yolk adds emulsifiers, fat, proteins, and carotenoid color, strengthening the bottom layer and aiding browning.
If your tahdig is technically crisp but visually anemic, a saffron-yogurt base can dramatically improve the result without changing the core method.
Troubleshooting by symptom
If your tahdig is pale but crisp:
- Increase the initial medium-heat stage by 2 minutes.
- Add saffron-yogurt base.
- Check for excess condensation.
If it is golden but stuck:
- Increase bottom fat slightly.
- Switch to a better pot.
- Lower the heat a touch next time.
If it is dark at the center and pale at edges:
- Your burner or pot has a hot spot.
- Use a heat diffuser or rotate the pot if your setup allows.
If it is crisp at edges, soft in center:
- Bottom layer too wet.
- Rice not drained well enough.
- Pot too large relative to burner.
If it breaks instead of lifting in one piece:
- Crust underdeveloped or bottom layer too loose.
- Try enriched rice base with yogurt and egg yolk.
If the top rice is gummy:
- Over-parboiled rice or poor drainage.
- Rice packed too tightly.
The core rules to remember
If you remember nothing else, remember these tahdig rules:
- Wash thoroughly to control loose starch.
- Soak long-grain rice so it elongates and cooks evenly.
- Parboil only to partial doneness; do not fully cook the rice.
- Drain well so the bottom fries rather than stews.
- Use enough fat to lubricate and conduct heat.
- Build the rice loosely and create steam vents.
- Wrap the lid with a towel to catch condensation.
- Start with moderate heat, then go low for the long steam.
- Choose a heavy, even-heating pot that suits the batch size.
- Rest before unmolding so the crust can release cleanly.
Tahdig rewards attention, but it is not mystical. Its famous crunch is the logical result of starches gelatinizing, water migrating, steam being managed, and the right amount of fat insulating and frying the bottom layer. The reason one batch turns shatter-crisp and another turns blond or stubbornly welded to the pot is not luck. It is the sum of these small physical choices.
And that is part of tahdig’s beauty. It is ceremonial but practical, traditional but deeply scientific. Persian cooks figured out long ago what many modern recipe shortcuts miss: the crust is best when it is built indirectly, through a sequence of washing, soaking, boiling, draining, layering, steaming, and patient heat. What emerges is not just crispy rice, but a fully integrated dish in which the fluffy grains above and the golden crust below depend on each other.
Once you understand that relationship, tahdig stops feeling temperamental. You begin to hear the right sizzle, sense the right steam, and trust the pot. Then one day you invert the rice, lift the pot, and there it is: a unified amber disc, crisp enough to crack, tender enough to bite through, and cleanly released as though it meant to happen all along.