Frozen Vegetables That Don’t Turn Mushy: Blanching Myths, Ice‑Crystal Science, and the “Dry‑Heat First” Method for Roasting, Stir‑Frying, and Soups
RecipeSimpli
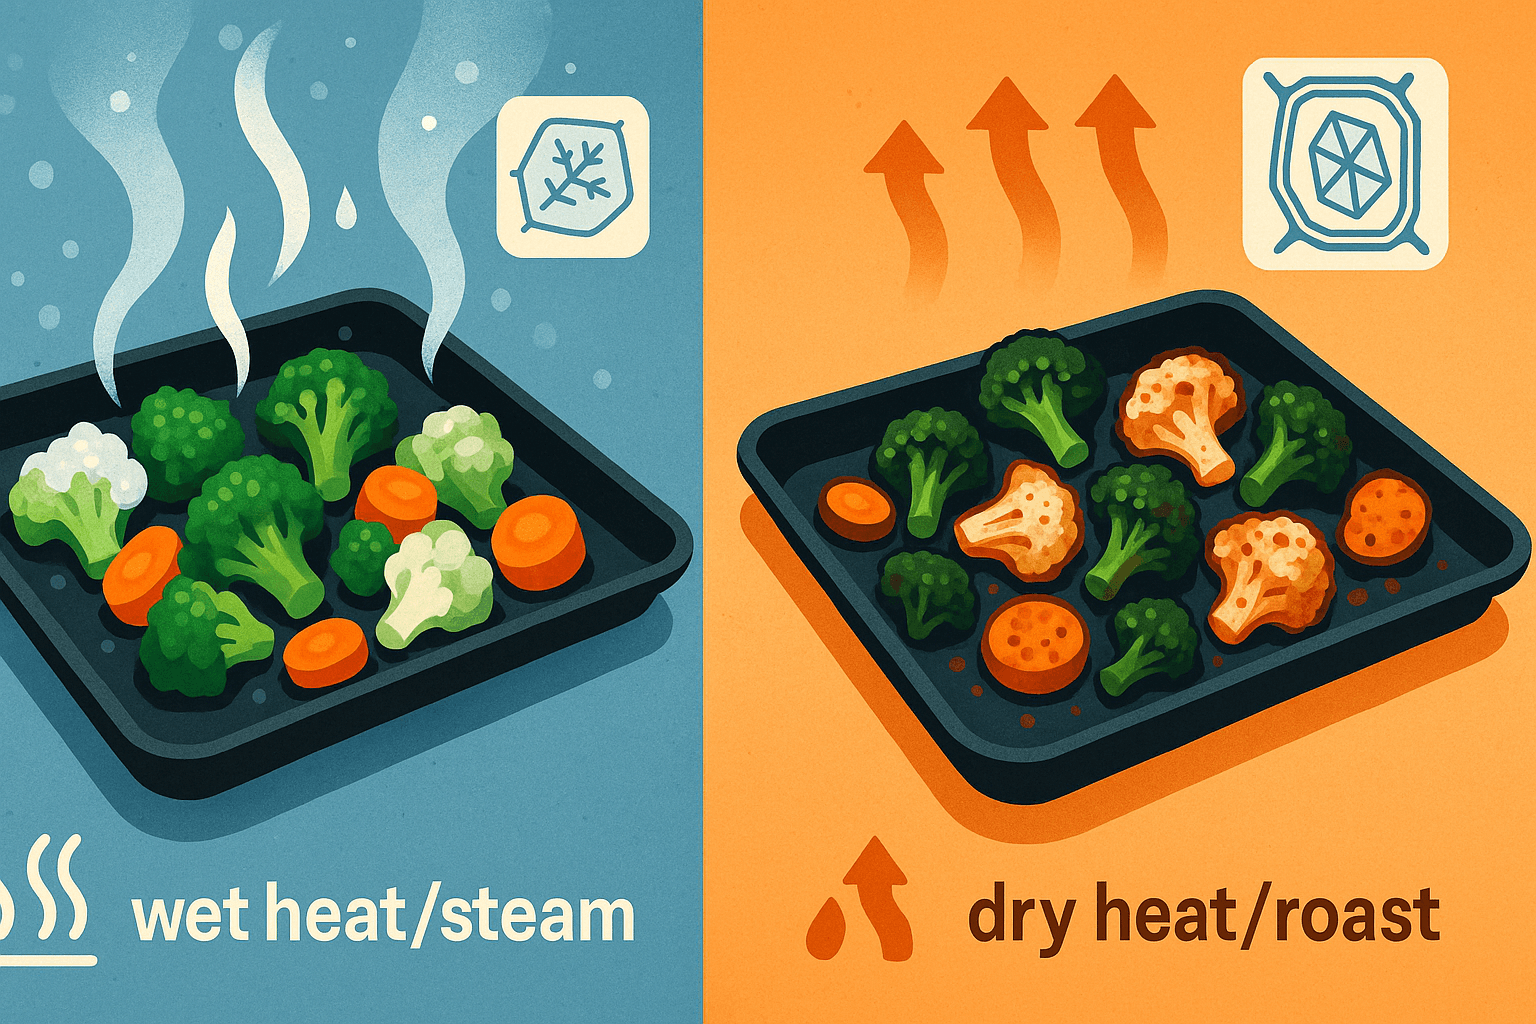
Frozen vegetables don’t have to be mushy
Frozen vegetables are one of the best shortcuts in a home kitchen: they’re prepped, affordable, available year-round, and often frozen close to harvest. Yet many cooks have the same complaint: why do frozen vegetables turn soggy, watery, and dull—especially when roasted or stir-fried?
The good news is that mushiness isn’t inevitable. It’s usually a predictable chain reaction involving ice crystals, damaged cell structure, surface moisture, pan temperature, and when you add sauce. Once you understand the mechanics, you can consistently get:
- Crisp edges and deep browning in roasted frozen vegetables
- Stir-fries that sear instead of steam
- Soups that taste fresh and bright without overcooked, collapsing vegetables
This article breaks down the science (in plain language), clears up common blanching myths, and teaches a reliable approach I’ll call the “Dry‑Heat First” method—a sequence that prioritizes evaporation and browning before you introduce moisture.
The real reason frozen vegetables go soggy
1) Ice crystals puncture plant cells
Vegetables are made of many tiny compartments (cells) held up by cell walls made mostly of cellulose and hemicellulose, plus a “glue” called pectin. When vegetables freeze, water inside and between cells turns to ice.
- Slow freezing forms larger ice crystals, which are more likely to rupture cell walls.
- Fast industrial freezing (IQF: individually quick frozen) forms smaller crystals, which cause less damage.
Even with IQF, some damage occurs. That’s why thawed frozen vegetables often look softer than fresh: the structure that used to hold water in place has been compromised.
Practical takeaway: A frozen vegetable starts cooking with a head start toward softness. You must compensate by controlling moisture and heat.
2) Melting frost becomes a steaming problem
Frozen vegetables carry surface frost and internal ice. As they heat:
- Ice melts into liquid water.
- That water absorbs heat (water has a high heat capacity).
- The pan/oven energy goes into boiling water instead of browning food.
Browning (Maillard reactions) needs relatively dry surfaces and higher surface temperatures. If your vegetables are wet, they steam, and steaming is fantastic for tenderness—but terrible for crisp edges.
3) Crowd the pan, and you create a sauna
Even if your oven is hot, a crowded sheet pan traps steam. Moisture can’t escape, so the vegetables sit in humid heat.
Practical takeaway: Mushiness is often a geometry problem (not enough surface area and airflow).
Blanching myths (and what blanching actually does)
Many frozen vegetables are blanched before freezing. That fact gets misunderstood.
Myth: “Blanching makes frozen vegetables mushy.”
Reality: Blanching is primarily about enzyme control, not softening.
Vegetables contain enzymes that keep working after harvest. These enzymes can degrade color, flavor, and texture over time in the freezer. A brief blanch (hot water or steam, then rapid cooling) slows those changes, helping frozen peas stay green and sweet months later.
Blanching can soften vegetables slightly—especially if overdone—but most mushiness people experience comes from:
- Overcooking at home
- Excess water during cooking (steam trap)
- The structure damage from freezing/thawing
Myth: “If frozen vegetables are blanched, you should always cook them less.”
Reality: You should cook them differently, not just “less.”
Because frozen vegetables release water, you often need more time at high heat to evaporate moisture and brown—and then less time once they’re dry.
That’s the logic behind Dry‑Heat First.
Thaw vs. no-thaw: the rules that actually work
“Never thaw frozen vegetables” is common advice, but it’s incomplete. The correct choice depends on what you’re trying to achieve.
When you should not thaw
Roasting and stir-frying generally work best from frozen because:
- Thawing turns ice into free water that immediately leaks out.
- That water coats surfaces and causes steaming.
Cooking from frozen lets you drive off water in the pan or in the oven while still pushing toward browning.
When you should thaw (or partially thaw)
Thawing can help when you need:
- Even mixing in cold applications (pasta salad, grain bowls)
- Faster, gentler heating (adding to a curry at the very end)
- Better control over water by draining and drying
If you thaw, do it strategically:
- Thaw in the fridge or briefly under cool running water in a colander.
- Drain very well.
- Dry aggressively (clean towel or paper towels).
- Then cook hot and fast.
The key idea
Whether you thaw or not, your real enemy is surface water at the moment you need browning.
The “Dry‑Heat First” method (the core technique)
Dry‑Heat First is a sequencing strategy:
- Apply high heat early to evaporate water rapidly.
- Delay salt, sauces, and aromatics that add moisture or burn.
- Brown first, season after, then finish with sauce or glaze.
Think of it like treating frozen vegetables as if they’re wearing a thin coat of ice you must remove before the “real cooking” begins.
Why it works
- Evaporation happens at ~100°C/212°F. Until surface water is gone, temperatures hover near boiling.
- Browning accelerates when surfaces can climb well above that.
So your first job is to create conditions where moisture can leave:
- High heat
- Plenty of airflow
- Sufficient contact with hot metal (in a pan) or hot, moving air (in an oven)
Roasting frozen vegetables that actually brown
Roasting is where frozen veg most commonly disappoints—because the sheet pan becomes a steam room.
The non-negotiables
- Hot oven: 450°F–500°F (232°C–260°C)
- Preheat the sheet pan: 10 minutes in the oven
- Don’t crowd: use two pans if needed
- Use oil, but not too much: enough to coat, not pool
Pooling oil plus meltwater can turn into a shallow braise.
Step-by-step: Dry‑Heat First roasting
- Preheat oven to 475°F / 245°C. Put an empty sheet pan inside.
- Toss vegetables (from frozen) with a small amount of oil (about 1–2 tablespoons per pound / 450g). Skip salt for now if you’re chasing maximum crisp.
- Spread on the preheated pan in a single layer. You should hear a sizzle.
- Roast 10–15 minutes without touching. This phase is mostly evaporation.
- Flip/stir, then roast another 8–15 minutes until you see browning.
- Season and finish: now add salt, pepper, spice blends, citrus zest, parmesan, toasted nuts, or a thick glaze.
Why delay salt?
Salt draws moisture to the surface (osmosis), which can slow browning early on. You can still salt early if you prefer, but if crisp edges are the goal, salting later often helps.
Best frozen vegetables for roasting
- Broccoli florets
- Cauliflower florets
- Brussels sprouts (halved if possible)
- Green beans
- Corn
- Mixed “roasting blends” that are mostly sturdy veg
Trick: separate “wet” vegetables
Some vegetables dump more water and sabotage others. Examples:
- Zucchini/summer squash
- Mushrooms
- Leafy greens (spinach)
Roast these separately or choose another method.
Example: Crispy roasted frozen broccoli with lemon-garlic finish
- Roast broccoli using the method above.
- When browned, toss with:
- 1 minced garlic clove (raw garlic goes in after roasting so it doesn’t burn)
- lemon zest + squeeze of lemon
- olive oil drizzle
- flaky salt
- optional: chili flakes, parmesan
Result: browned edges, bright aroma, no watery puddle.
Stir-frying frozen vegetables without steaming
A stir-fry succeeds or fails on one thing: pan temperature. If your pan cools down and water accumulates, you’re not stir-frying—you’re steaming.
The main mistakes
- Using too much frozen veg at once
- Not preheating long enough
- Adding sauce before searing
- Using a nonstick pan at low heat (sometimes necessary, but it limits sear)
Best gear
- Carbon steel wok or cast iron skillet
- A strong burner (gas is ideal, but electric can work with smaller batches)
The Dry‑Heat First stir-fry sequence
- Preheat your pan until very hot. Add a high-smoke-point oil.
- Add frozen vegetables in a manageable batch. You want immediate sizzling.
- Spread, don’t stir constantly for the first minute or two. Let water flash off.
- Stir/flip as moisture evaporates and vegetables begin to blister.
- Season after the steam phase: add salt, dry spices, then aromatics.
- Add sauce at the end and reduce quickly until it clings.
Sauce sequencing: why “at the end” matters
Most stir-fry sauces are water-based (soy sauce, stock, rice vinegar, wine). If you add them too early, you drop the pan temperature and lock the vegetables into a steamy braise.
Instead:
- Sear vegetables first.
- Add sauce in a ring around the pan edge (hotter zone).
- Let it bubble and reduce before tossing.
Example: Weeknight freezer-veg stir-fry (restaurant-style feel)
Vegetables: frozen broccoli + bell pepper strips (if you have them) + snap peas
Sauce:
- 2 tbsp soy sauce
- 1 tbsp oyster sauce (or hoisin)
- 1 tbsp water
- 1 tsp cornstarch
- 1 tsp sesame oil
Method:
- Sear frozen veg hot in oil.
- When edges brown, push veg aside, add garlic/ginger briefly.
- Pour sauce around edges; bubble until glossy.
- Toss fast; finish with scallions.
Soups and stews: avoiding “gray, tired” frozen vegetables
Soups seem forgiving, but frozen vegetables often end up overcooked because they get tossed in early and simmered to death.
The key: add frozen vegetables late
Frozen vegetables are already partially cooked (often blanched). In soups, your goal is usually:
- Heat through
- Keep color
- Keep shape
So:
- Add sturdy frozen veg (corn, peas, green beans) in the last 3–8 minutes.
- Add delicate veg (spinach) in the last 30–60 seconds.
Use two-stage cooking for better flavor
If you want deep flavor and bright vegetables:
- Build flavor base first (sauté aromatics, spices, tomato paste).
- Simmer your broth/starch/protein until done.
- Add frozen vegetables at the end.
Example: Chicken soup with bright peas and green beans
- Simmer chicken, aromatics, and noodles/rice until cooked.
- Turn heat to a gentle simmer.
- Add frozen peas and green beans for 4–5 minutes.
- Finish with lemon and herbs.
This prevents peas from turning olive-colored and mealy.
Moisture management: the hidden skill
If you take only one concept from this article, make it this:
Frozen vegetables fail when their water can’t escape fast enough.
Here’s how to ensure it can.
1) Batch size matters more than you think
- In a skillet, cook frozen veg in two batches rather than one crowded batch.
- On a sheet pan, leave space between pieces; use two pans if needed.
2) Preheating isn’t optional
A cold pan + frozen veg = instant puddle. Preheating gives you thermal momentum.
- Preheat sheet pans.
- Preheat woks longer than feels necessary.
3) Choose the right fat
For high heat:
- Avocado oil, refined peanut oil, canola, grapeseed
- Olive oil works for roasting at 450°F for many people, but it can smoke at higher temps depending on refinement.
4) Understand vegetable categories
Not all frozen vegetables behave the same.
High-success, sturdy:
- Broccoli, cauliflower, Brussels sprouts
- Corn
- Green beans
- Peas (not for browning, but great for quick heating)
Trickier (high water, fragile structure):
- Zucchini/squash
- Mushrooms
- Spinach
For the tricky ones, aim for:
- Soups, curries, casseroles
- Or remove water first (see next section)
Advanced fixes for extra-crisp results
Technique: microwave “de-ice,” then dry-heat
This sounds counterintuitive, but it can work brilliantly.
- Microwave frozen vegetables for 1–3 minutes—just until ice melts.
- Drain thoroughly.
- Pat dry.
- Then roast or stir-fry on high heat.
This moves the “melting” step off your sheet pan, so the pan can focus on browning.
Technique: the towel press (for thawed veg)
If you must thaw (or you bought a bag that’s clumpy and icy), treat it like watery fresh veg:
- Put thawed veg in a clean towel.
- Twist and squeeze firmly over the sink.
You’ll be shocked how much water comes out.
Technique: cornstarch dusting for roasting
A light dusting of cornstarch can improve crispness by:
- absorbing surface moisture
- forming a micro-thin crust
How:
- Toss frozen veg with oil first.
- Sprinkle 1–2 teaspoons cornstarch per pound, toss again.
- Roast hot.
Works well for cauliflower and broccoli.
Cultural context: frozen vegetables as a smart pantry, not a compromise
Across many cuisines, cooks use preservation methods (drying, salting, fermenting, freezing) not as a fallback, but as a way to shape flavor and availability.
Modern freezing—especially IQF—has made vegetables more consistent than ever. In some cases, frozen can beat “fresh” that’s traveled long distances and sat for days. The challenge is that frozen vegetables demand different technique: more attention to evaporation, less reliance on gentle cooking methods that are perfect for fresh produce.
The Dry‑Heat First approach mirrors professional kitchen logic:
- Drive off moisture.
- Create browning.
- Add finishing flavors when they’ll stay vivid.
Practical cheat sheets
Roast: quick rules
- Oven: 475°F / 245°C
- Pan: preheated
- Layer: single, spaced
- First phase: leave it alone 10–15 min
- Season/sauce: after browning
Stir-fry: quick rules
- Pan: very hot
- Batch: small
- First phase: sear, don’t immediately stir
- Sauce: last, reduce to glaze
Soups: quick rules
- Build base first
- Add frozen veg at the end
- Simmer briefly to heat through
- Finish with acid/herbs for brightness
Troubleshooting: why it’s still mushy (and what to do)
“My roasted veg is watery and pale.”
- You crowded the pan → use two pans.
- Oven too cool → increase to 475–500°F.
- Pan not preheated → preheat it.
- Too much oil → use less; avoid pooling.
“My stir-fry tastes fine but the vegetables are limp.”
- Batch too large → cook in batches.
- Sauce too early → glaze at the end.
- Pan not hot enough → longer preheat; consider cast iron.
“My soup vegetables disappear.”
- You added them too early → add late.
- Boiling too hard → gentle simmer after adding.
“The bag is full of ice and clumps.”
- Likely temperature abuse/refreezing → break apart, microwave-de-ice, drain, dry, then cook.
A note on sources and food science
The concepts here align with widely taught culinary science:
- Ice-crystal size and freezing rate affecting texture is standard food science in texts like On Food and Cooking (Harold McGee).
- Browning vs. steaming follows basic thermodynamics: wet surfaces hover near water’s boiling point until moisture evaporates.
- Blanching’s role in enzyme inactivation is a cornerstone of food preservation guidance from university extension programs and food safety authorities.
You don’t need lab equipment—just the right sequence.
Putting it all together: the mindset shift
Frozen vegetables aren’t doomed to be mushy. They’re simply different ingredients than fresh vegetables.
If you treat them like fresh—moderate heat, crowded pans, early sauce—you’ll get steam-softened results.
If you treat them like what they are—vegetables plus extra water and a slightly weakened structure—and you prioritize Dry‑Heat First, you’ll get vegetables that are:
- browned at the edges
- pleasantly tender (not collapsing)
- brightly seasoned
- integrated into sauces without turning into soup
The next time you pull a bag of broccoli, green beans, or stir-fry mix from the freezer, don’t ask “Do I thaw?” Ask:
“How do I get rid of the water before I ask this vegetable to brown?”
Answer that well, and mushy frozen vegetables become a solved problem.