Pressure Cooker vs. Slow Cooker vs. Braise: Collagen Conversion, Liquid Ratios, and Timing Windows for Fork‑Tender Beef, Pork, and Beans
RecipeSimpli
The tender truth: time, temperature, and moisture (not just “low and slow”)
Fork-tender beef, spoonable pulled pork, and creamy beans all come down to one central transformation: tough structural proteins and starches becoming soft and luscious. For meat, that’s largely about collagen converting into gelatin. For beans, it’s about starch gelatinization and pectin changes in the cell walls, plus careful hydration.
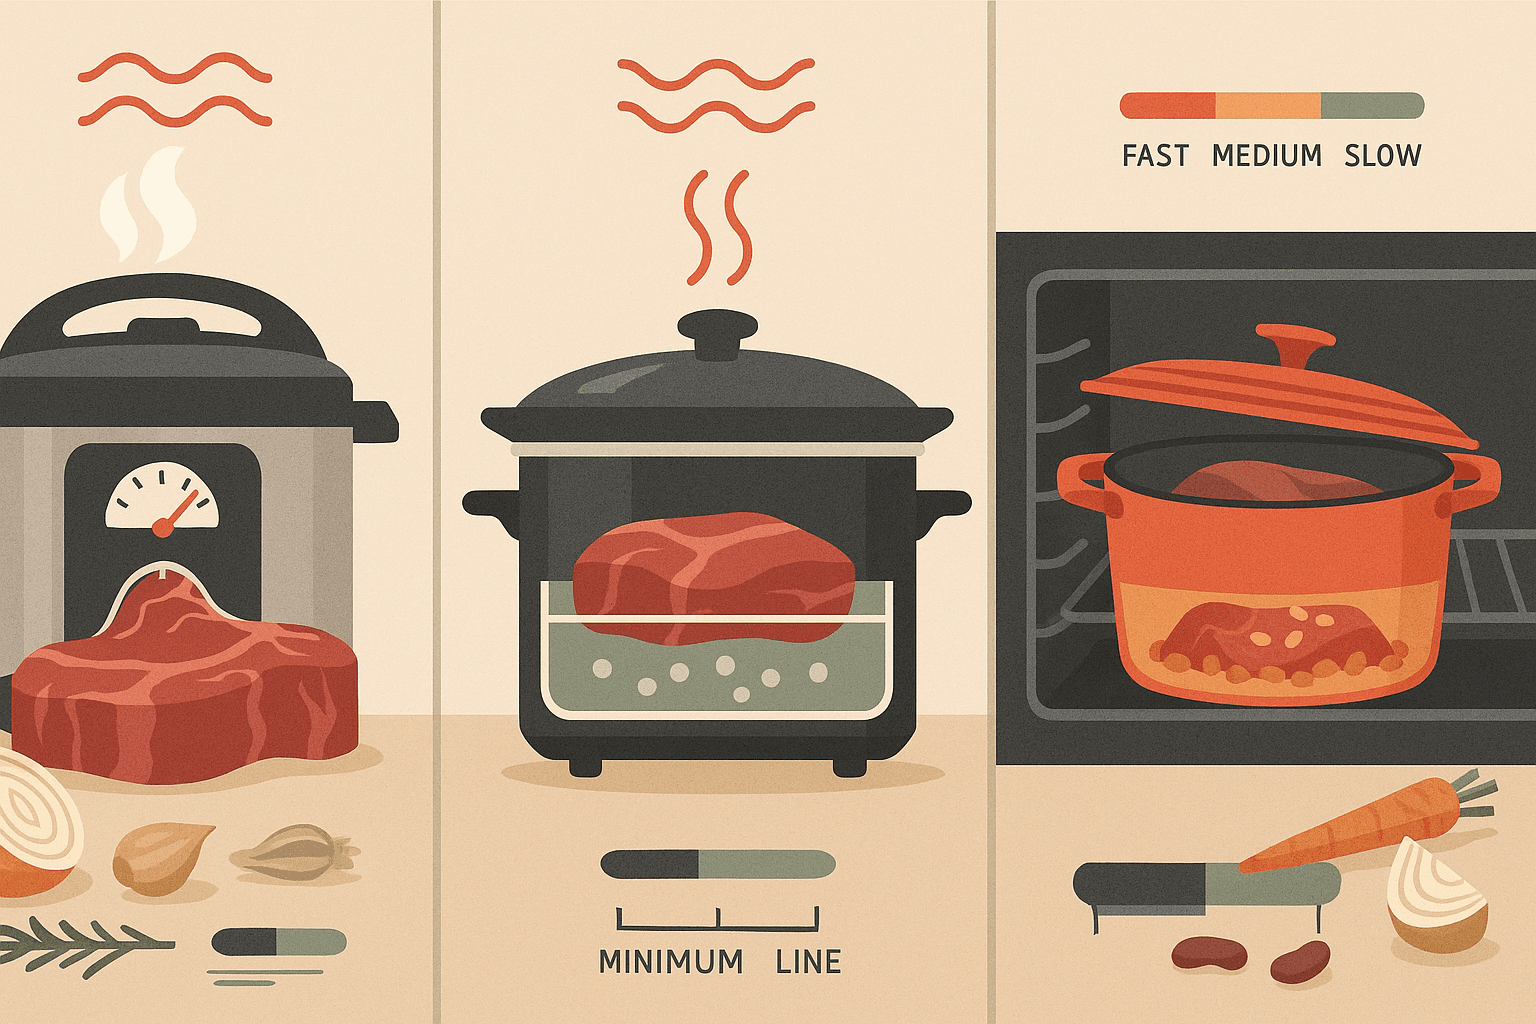
Home cooks have three common tools for the job:
- Pressure cooker (stovetop or electric): hot and fast under pressure
- Slow cooker: low heat over a long window with minimal attention
- Braising (Dutch oven on stovetop/oven): controlled simmer with evaporation and reduction
All three can produce spectacular results—and all three can fail in predictable ways: dry roasts, stringy meat, beans that split or never soften, or sauces that stay thin and flat. The trick is understanding what’s happening in the pot and how to match the method to the ingredient.
This guide compares these methods through the lenses that matter most:
- Collagen conversion and texture (why “tender” sometimes still tastes dry)
- Liquid ratios and minimums (how little is too little, and how much is too much)
- Timing windows (when meat is “done,” “perfect,” or “over”)
- Salt timing (when salting helps and when it slows you down)
- A practical decision chart to choose the right method and avoid common disasters
The science in plain terms: collagen, gelatin, and why pressure changes the game
Collagen → gelatin: the main event for tough cuts
Tough cuts like beef chuck, brisket, short ribs, pork shoulder, shanks, oxtail are loaded with collagen. Collagen is a connective-tissue protein that is chewy and tight when cooked quickly, but becomes gelatin with sustained heat and moisture.
- Collagen begins to contract and squeeze out water as temperatures climb.
- Over time, collagen hydrolyzes (breaks down) into gelatin.
- Gelatin binds water and gives that silky mouthfeel and “body” to sauces.
The paradox: meat can reach a “safe” temperature and still be tough because collagen conversion takes time.
Why pressure speeds tenderness
A pressure cooker doesn’t magically “tenderize.” It raises the boiling point of water, which raises the cooking temperature of a moist environment.
- At standard atmospheric pressure, water boils at 100°C / 212°F.
- Under pressure (typical home pressure cookers), the cooking environment is around 115–121°C / 239–250°F.
That higher temperature accelerates:
- Collagen-to-gelatin conversion
- Starch gelatinization in beans
- Flavor extraction into liquid (but also increases risk of overcooking)
This is why a chuck roast that might take 3–4 hours to braise can become tender in 45–75 minutes under pressure.
Slow cookers: gentle heat, narrower peak temperature
Most slow cookers operate around:
- Low: roughly 85–95°C / 185–203°F (varies by model)
- High: closer to simmering, often 95–100°C / 203–212°F
That means collagen conversion happens, but more slowly, and the cooking liquid rarely reduces on its own because the lid traps steam.
Braising: controlled simmer + evaporation = built-in sauce making
Braising typically aims for a gentle simmer (small bubbles), often in the oven for stability. Compared with a slow cooker, braising usually has more:
- Evaporation (even with a lid)
- Surface browning opportunities before the liquid goes in
- Temperature stability (oven braise especially)
As a result, braises often produce deeper flavor and naturally thicker sauce.
Collagen conversion vs. moisture loss: why “tender” can still be dry
Texture has two separate components:
- Tenderness: collagen broken down, muscle fibers softened
- Juiciness: how much water remains in the muscle fibers
Long cooking makes collagen convert, which improves tenderness. But muscle fibers can still lose moisture as they denature and contract.
Here’s the practical takeaway:
- Pressure cooking can produce very tender meat quickly, but it can also overshoot into a “stringy but dry” zone if cooked too long—because the higher temperature accelerates both collagen conversion and moisture loss.
- Slow cooking gives you a bigger window to hit tenderness, but some leaner cuts (or poorly marbled roasts) can still become dry and mealy after too many hours.
- Braising offers the best control over reduction and sauce texture, and it’s easier to stop precisely when tender.
If you’ve ever had pot roast that shreds easily but tastes oddly dry, you’ve likely hit the point where collagen is melted but muscle fibers have tightened and emptied—and there isn’t enough gelatin-rich sauce clinging to each bite to compensate.
Liquid ratios and minimums: the part most recipes get vague about
Liquid isn’t just for preventing burning. It determines:
- Whether heat transfer is even
- Whether flavors are concentrated or diluted
- Whether sauce finishes silky or thin
- For beans, whether hydration is complete and consistent
Pressure cooker liquid: minimums are real (and model-specific)
Pressure cookers need enough liquid to generate steam and maintain pressure. Too little can trigger burn warnings (electric models) or scorching.
General minimums (check your manual):
- Electric pressure cookers (e.g., Instant Pot): typically 1 to 1½ cups (240–360 ml) minimum
- Stovetop pressure cookers: often ½ to 1 cup (120–240 ml) minimum
But minimums aren’t the same as “ideal.” Consider the food:
- Large roast (3–5 lb / 1.4–2.3 kg): 1 to 2 cups liquid is common because the meat releases some juice.
- Beans: need more water because they absorb it—think in ratios (below).
Key pressure-cooker principle: you generally cannot reduce sauce during cooking (not without venting and losing pressure). Plan to thicken after using simmer mode, sauté mode, or a separate reduction step.
Slow cooker liquid: less evaporation means you need less than you think
Slow cookers trap moisture. Ingredients release water, and very little escapes.
- For meat braise-style dishes, you often need less added liquid than a stovetop recipe.
- A common mistake is adding enough stock to “cover” the roast like a braise—then ending with thin, watery sauce.
Rule of thumb:
- For a slow-cooker pot roast, start with ½ to 1 cup (120–240 ml) liquid plus aromatic vegetables (onions, carrots). Add more only if your model runs hot or you’re cooking very lean meat.
Braising liquid: you’re aiming for partial submersion
Classic braising aims to keep meat partly submerged, not swimming.
- Typically ⅓ to ½ of the height of the meat in liquid.
- Enough to buffer heat and dissolve gelatin, but not so much that flavor dilutes.
Because braises evaporate and reduce, you can start with a bit more than you’d want at the end—then finish by adjusting lid position and reduction.
Beans are their own universe: hydration, pectin, and why they split
Beans fail for different reasons than meat.
What makes beans soften?
Beans soften when:
- Water fully hydrates the interior
- Starches gelatinize
- Pectin in cell walls breaks down enough to let cells separate without exploding
Why beans split or turn to mush
Splitting happens when:
- The skins hydrate and soften faster than the interiors
- The cooking environment is too aggressive (hard boil, high pressure too long)
- The beans are old (hard-to-cook phenomenon), causing uneven softening
Why beans stay hard
Common culprits:
- Old beans (especially if stored warm)
- Highly acidic cooking liquid early (tomatoes, vinegar, wine)
- Very hard water (high calcium/magnesium)
Salt is often blamed, but modern testing and many food science voices (including Serious Eats’ bean work, and general culinary science consensus) show that salting the cooking water can improve texture by seasoning throughout and helping skins stay intact. Acid is the bigger hardening factor when added early.
Salt timing: when to salt meat and beans in each method
Meat: salt early when you can
For big roasts and braises, salting in advance is one of the easiest wins.
- Dry brine (salt the meat and rest uncovered in the fridge) for 8–24 hours if possible.
- Salt penetrates slowly and helps with seasoning throughout.
If you can’t salt ahead:
- Salt right before browning.
- In pressure cooking and slow cooking, you may need to finish with additional salt because flavors don’t concentrate the way they do in a reducing braise.
Beans: salt early (usually), acid late
For most beans:
- Salt the cooking water from the start (or at least early in cooking).
- Add acidic ingredients after beans are mostly tender.
Exceptions and nuance:
- If you’re using strongly salted meats (ham hock, bacon, salt pork), start with less added salt and adjust later.
- If you must cook beans in a very acidic environment (certain traditional dishes), expect a longer cook or pre-cook beans separately.
Method-by-method: where each shines, and where it can bite you
1) Pressure cooker: fastest collagen conversion, narrow timing window
When pressure cooking wins
- Weeknight pulled pork, beef barbacoa, chile verde
- Tenderizing tough cuts quickly for tacos, stews, ragù
- Cooking beans from dry without soaking (often in under 45 minutes)
- Extracting gelatin and flavor for quick broths (not the same clarity as a slow stock, but rich)
Collagen and texture under pressure
Pressure’s higher temperature accelerates collagen conversion—but also increases the risk of overshooting.
Timing window:
- Undercooked: still tight, sliceable, slightly tough
- Perfect: fork-tender, shreddable, moist with gelatin-rich juices
- Overcooked: dry/stringy meat fibers, even if “tender”
Because the window can be narrow, use these safeguards:
- Prefer natural pressure release (NPR) for large roasts (10–20 minutes) to reduce moisture loss and prevent violent boiling.
- Cut meat into large chunks instead of one massive piece for more even cooking and faster tenderness.
- Don’t overfill: keep to your cooker’s max line.
Liquid guidance (pressure cooker)
- Meet the model’s minimum liquid requirement.
- For meat: 1–2 cups plus onions/tomatoes etc. is common.
- For thick sauces: plan to reduce after (sauté mode) or thicken with a slurry.
Beans in a pressure cooker: fast, but be precise
Unsoaked beans (typical ranges at high pressure):
- Black beans: ~25–35 min + NPR
- Pinto beans: ~25–40 min + NPR
- Chickpeas: ~35–55 min + NPR
- Kidney beans: ~30–40 min + NPR (boil briefly first if you’re cautious; kidney beans contain lectins—pressure cooking generally handles this, but follow reputable guidance)
- Lentils: often not ideal under high pressure unless you want them very soft (they cook quickly)
Water ratio:
- Start around 3:1 water to beans by volume (adjust for bean type and desired thickness). For 1 cup dry beans, try 3 cups water/broth.
To avoid blown-out beans:
- Use NPR to prevent the contents from boiling explosively.
- Avoid overcooking; beans continue to soften during NPR.
- Add acids (tomato, vinegar, citrus) after tenderness.
Pressure cooker best uses
- Shredded meat dishes where sauce can re-moisten fibers
- Bean cookery where speed matters and you can dial in timings
- Dishes where you’ll finish with reduction, shredding, or sauce building
2) Slow cooker: forgiving schedule, tricky sauce, sometimes bland unless you intervene
When the slow cooker wins
- You need a wide holding window (workday cooking)
- You want low-effort batch cooking: chili, carnitas-style pork (then crisp), beef stew
- You’re cooking stew pieces, not aiming for a glossy reduced sauce
Collagen conversion in a slow cooker
Slow cookers excel at gradually converting collagen without much babysitting.
But two common issues show up:
- Lean cuts dry out over long times (yes, even in liquid)
- Sauces stay thin because there’s little evaporation
Liquid guidance (slow cooker)
- Use less liquid than you’d use for a braise.
- Meat releases juices; vegetables exude water.
Practical starting points:
- Pot roast (3–4 lb): ½–1 cup stock/wine + onions
- Stew: just enough to come about halfway up the ingredients; you can always add later
To thicken sauce:
- Remove lid for the last 30–60 minutes on high (works only somewhat).
- Or ladle liquid into a saucepan and boil to reduce.
- Or use a slurry (cornstarch) or beurre manié; or blend a portion of beans/veg.
Flavor and browning
Slow cookers don’t brown well. Browning drives Maillard reactions that add roasty depth.
If you want more flavor:
- Brown meat in a skillet first.
- Sauté tomato paste and aromatics before adding.
- Use umami boosters: fish sauce, soy sauce, anchovy, mushrooms.
Beans in a slow cooker
This is the most contentious pairing.
- Some slow cookers run at temperatures that can be marginal for certain beans.
- Kidney beans are often singled out: they contain phytohaemagglutinin, which is neutralized by adequate boiling; many safety guidelines recommend boiling kidney beans before slow cooking.
If you slow cook beans:
- Prefer a model that reaches a reliable simmer on high.
- Consider parboiling or using a pressure cooker for beans, then finishing in the slow cooker with flavors.
Slow cooker best uses
- Dishes where convenience matters most
- Recipes that don’t rely on reduction for sauce quality
- “Cook then finish” workflows (shred pork, reduce sauce separately, crisp under broiler)
3) Braising: the flavor builder with the best sauce control
When braising wins
- You want the best texture + best sauce in one process
- You enjoy the process: browning, deglazing, aroma building
- You want visual control (peek, baste, adjust heat)
Braising fundamentals (what makes it different)
A great braise typically includes:
- Searing/browning the meat
- Aromatic base (onion, carrot, celery, garlic)
- Deglazing (wine, stock, beer)
- Gentle simmer in oven or stovetop until collagen converts
- Reduction and finishing (skim fat, adjust salt/acid, mount with butter)
Temperature control: simmer, don’t boil
Boiling can:
- Agitate meat fibers and make them seem stringier
- Emulsify fat into the liquid in a greasy way
- Increase evaporation too quickly
Aim for a lazy simmer and steady heat.
Liquid guidance (braise)
- Add liquid to reach ⅓ to ½ up the meat.
- Lid on (or slightly ajar) depending on how much reduction you want.
Timing windows (braise)
Braising is slower than pressure cooking, but offers a generous sweet spot.
- Many roasts hit peak tenderness between 2½ and 4½ hours depending on size, cut, and temperature.
- If not tender, it usually needs more time, not higher heat.
Beans and braising
Beans aren’t typically “braised” the same way, but stovetop simmering in a pot (a form of gentle wet cooking) offers excellent control.
- You can keep them just below a boil.
- You can add aromatics early and acids late.
- You can stop the moment they’re creamy but intact.
Braise best uses
- Classic pot roast, beef bourguignon, osso buco, adobo-style stews
- Dishes where the sauce is a centerpiece
- When you want maximum flavor development from browning + reduction
Ideal liquid minimums and ratios: a practical cheat sheet
Meat (beef/pork) minimums and targets
Pressure cooker (electric):
- Minimum: 1–1½ cups liquid (check manual)
- Typical for 3–5 lb roast: 1–2 cups plus aromatics
- Expect to reduce after
Pressure cooker (stovetop):
- Minimum: often ½–1 cup
Slow cooker:
- Typical: ½–1 cup added liquid for a roast, more for stew but rarely “covering”
Braise (Dutch oven):
- Target: liquid to ⅓–½ height of meat
Beans ratios
Pressure cooker:
- Start around 3 cups water per 1 cup dry beans
- For thicker, chili-style beans: 2½:1 may work with experience
Stovetop simmer (braise-like control):
- Usually 3–4:1 water to beans, then cook uncovered to desired thickness
Slow cooker:
- If you do it, use enough to keep beans submerged; monitor because evaporation is low but absorption is high.
Timing windows that matter (so you don’t overshoot)
Beef chuck / pot roast (3–4 lb)
- Pressure cooker: ~60–75 min high pressure + 15–20 min NPR
- Slow cooker: 8–10 hrs low (or 4–6 hrs high)
- Braise (oven ~300°F / 150°C): ~3–4 hrs
Pork shoulder / butt (3–5 lb)
- Pressure cooker: ~60–90 min high pressure + NPR (cut into chunks for speed)
- Slow cooker: 8–10 hrs low
- Braise: 3–5 hrs depending on size and temperature
Beans (1 lb / ~2 cups dry)
- Pressure cooker: commonly 25–55 min + NPR depending on type
- Stovetop: 60–120 min depending on type/age
- Slow cooker: variable and model-dependent; often several hours and less predictable
These are starting ranges, not absolutes. Bean age, meat thickness, and cooker performance all shift timings.
How to avoid three common disasters
1) Dry roast (even though it’s “tender”)
Why it happens:
- Overcooked muscle fibers + not enough gelatin-rich sauce clinging to meat
Fixes by method:
- Pressure cooker: shorten time; use NPR; cook in chunks; finish by resting meat in its liquid (10–20 minutes) before shredding.
- Slow cooker: use a more marbled cut; reduce total time; don’t run it on high for too long; add gelatin sources (skin-on cuts, shank, collagen-rich stock).
- Braise: keep at a gentle simmer; stop as soon as a fork slides in; rest meat in sauce.
2) Broken beans (split skins, mushy centers)
Why it happens:
- Overcooking, aggressive boiling, violent pressure release, uneven hydration
Fixes:
- Use NPR in pressure cooking.
- Avoid hard boiling on stovetop.
- Consider soaking for very large beans or if your beans are older.
- Add acids late.
3) Thin sauce (tastes diluted)
Why it happens:
- Too much added liquid, minimal evaporation, lack of reduction
Fixes by method:
- Pressure cooker: reduce after pressure cooking using sauté mode; remove meat first so you don’t overcook it.
- Slow cooker: use less liquid at the start; reduce separately in a saucepan; or thicken intentionally.
- Braise: crack the lid, braise uncovered for part of the time, or reduce at the end.
A simple decision chart (choose your best method)
Use this as a quick guide when you’re standing in the kitchen with a roast or a bag of beans.
Step 1: What are you cooking?
A) Tough, collagen-rich meat (chuck, brisket, short ribs, pork shoulder, shanks)
- Want it tonight (under ~2 hours total)? → Pressure cooker
- Want best sauce and don’t mind active steps? → Braise
- Want set-it-and-forget-it while you’re away? → Slow cooker
B) Lean meat (pork loin, beef round, chicken breast)
- None of these methods are ideal for “fork-tender” without drying. Prefer gentler roasting, sous vide, or quick braise with careful timing. If you must: choose braise with a shorter cook and more monitoring.
C) Dried beans
- Need speed and consistency? → Pressure cooker
- Want maximum control and don’t mind watching the pot? → Stovetop simmer
- Want unattended cooking? → Slow cooker only if you know your model reaches safe temps; consider parboiling first, especially for kidney beans.
Step 2: Do you need thick, glossy sauce built-in?
- Yes → Braise (or pressure cook, then reduce)
- No / sauce is secondary → Slow cooker or pressure cooker
Step 3: How narrow is your timing window?
- You need flexibility (food can hold for hours) → Slow cooker
- You can stop close to serving time → Braise
- You can’t risk overshooting and want fast → Pressure cooker (but follow a tested time)
Practical workflows (real-world examples)
Example 1: Weeknight shredded beef tacos (pressure cooker workflow)
- Cut chuck into 3–4 inch chunks; salt (even 30 minutes helps).
- Brown in batches (optional but worth it).
- Add 1–1½ cups broth, chiles/spices, onions.
- Pressure cook 60 minutes high + NPR 15 minutes.
- Remove beef; reduce liquid on sauté until slightly thick.
- Shred beef and fold back into sauce.
Why it works: pressure delivers tenderness quickly; reduction afterward prevents watery flavor.
Example 2: Classic pot roast Sunday dinner (braise workflow)
- Dry brine roast overnight if possible.
- Sear deeply; build soffritto base.
- Deglaze with wine; add stock to ⅓–½ height.
- Oven braise at ~300°F / 150°C until fork-tender (3–4 hours).
- Rest meat in sauce; skim fat; reduce if needed.
Why it works: browning + evaporation builds sauce; gentle oven heat keeps simmer stable.
Example 3: Creamy pintos for burritos (beans in pressure cooker)
- Rinse beans; optionally soak if very old.
- Add beans + water (about 3:1) + salt + aromatics.
- Cook 28–35 minutes high pressure + NPR.
- If too thin, simmer uncovered and mash a ladle of beans to thicken.
- Add acids (lime, tomatoes) at the end.
Why it works: pressure hydrates fast; finishing step lets you control texture.
Cultural context: why cuisines choose different methods
Many traditional dishes evolved around the constraints and advantages of available cooking setups:
- Braises and stews (French daubes, Italian ragù, Mexican birria-style preparations) often rely on open-pot reduction and staged flavor building—perfect for Dutch ovens.
- Beans across Latin America, the American South, and the Mediterranean are often cooked with careful simmering and late-stage seasoning—stovetop control suits this.
- Pressure cooking became popular in home kitchens as a time-saving evolution of long braises, especially for busy households—delivering tenderness fast, with finishing steps to mimic the depth of slower methods.
Understanding the “why” behind the tradition helps you adapt intelligently: pressure cook the meat, then finish like a braise; slow cook for convenience, then reduce like a sauce maker.
Expert-source anchors (for further reading)
If you want to go deeper into the science, look for:
- Harold McGee, On Food and Cooking (foundational culinary science on proteins, collagen, gelatin)
- J. Kenji López-Alt / Serious Eats (practical testing on beans, salting, and pressure cooking)
- Modernist Cuisine (deep dives into temperature, pressure, and texture)
Bottom line: which method wins?
- Pressure cooker wins on speed and can produce outstanding tenderness—especially for shreddable meats and weeknight beans—if you respect minimum liquid and timing, and finish with reduction.
- Slow cooker wins on convenience and schedule forgiveness, but requires restraint with added liquid and often benefits from pre-browning and post-cook sauce thickening.
- Braising wins on flavor development and sauce quality, with excellent control and a generous tenderness window—at the cost of time and a bit more hands-on effort.
If you remember one guiding principle, make it this:
Choose the method that matches your ingredient’s needs and your desired sauce outcome—then control liquid and timing so collagen conversion happens before moisture loss ruins the party.