Homemade Sourdough Starter That Doesn’t Fail: Hydration Math, Temperature Control, and a “Peak-to-Peak” Feeding Schedule for Reliable Rise
RecipeSimpli
Why starters “fail” (and why yours doesn’t have to)
A sourdough starter is a tiny ecosystem: wild yeast and lactic acid bacteria (LAB) living in a flour-and-water paste. When it thrives, it reliably rises, smells pleasantly tangy, and leavens bread. When it struggles, you might see mold, smell harsh solvent notes, get watery “hooch,” or experience sluggish fermentation.
Most “failed” starters aren’t truly dead—they’re simply mismanaged. Three variables explain the vast majority of problems:
- Hydration math (how much water relative to flour)
- Temperature control (how fast microbes reproduce and acidify)
- Feeding schedule aligned with fermentation peaks rather than the clock
This guide focuses on building a starter that behaves predictably and strengthens over time, using a peak-to-peak schedule: you feed it when it reaches peak rise (or just after), not whenever a recipe says “feed every 12 hours.” That single concept, paired with accurate ratios and reasonable temperature management, eliminates most frustration.
Along the way, you’ll learn how to avoid mold, manage hooch, pick jar size, recognize peak cues, and pause or revive a starter without drama.
The science in plain language: who’s in your jar?
A mature starter is dominated by:
- Yeasts (often Saccharomyces, Candida, Kazachstania species depending on region and flour) that produce CO₂ and alcohol.
- Lactic acid bacteria (commonly Lactobacillus and relatives) that produce lactic and acetic acids.
This partnership is ancient and cross-cultural—sourdough is one of humanity’s oldest fermentation technologies, found in everything from San Francisco-style loaves to German rye breads, Ethiopian injera, and many traditional farmhouse breads across Europe and the Middle East.
From a culinary-science perspective, the key is balance:
- Yeast activity gives lift.
- LAB acidification gives flavor and helps suppress spoilage organisms.
Your job is to create conditions where both groups can stabilize into a resilient community.
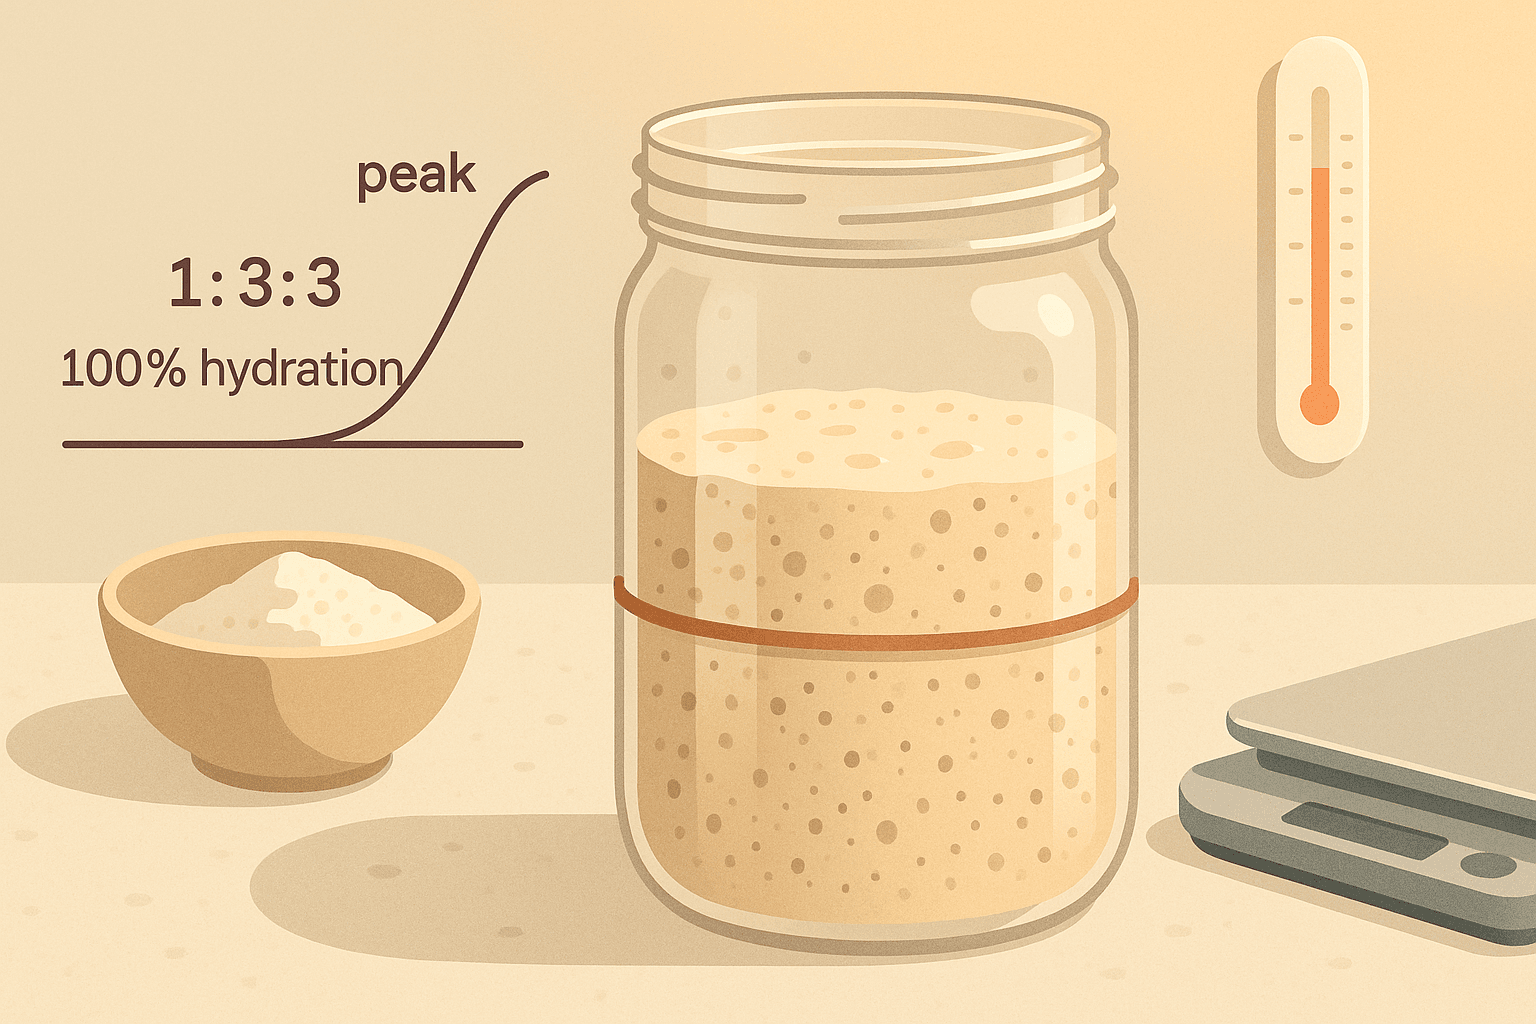
Hydration math: the one skill that makes everything easier
Baker’s percentages (the simplest way to think about starter)
In bread baking, flour is always 100%. Hydration is the percentage of water relative to flour.
- 100% hydration starter means equal weights flour and water.
- 80% hydration starter means 80 g water per 100 g flour.
- 125% hydration starter means 125 g water per 100 g flour.
Important: Always measure by weight, not volume. Cups are too variable (flour compacts; humidity changes). A cheap digital scale is the single best “sourdough insurance policy.”
Why 100% hydration is the best default
A 100% hydration starter (equal weights flour and water) is popular because:
- It’s easy to calculate.
- It ferments predictably in typical home temperatures.
- It’s fluid enough for easy mixing and oxygen distribution.
- It creates clear visual rise cues (bubbles + expansion).
You can absolutely use stiffer starters (60–80% hydration) or looser ones (125%+), but for reliability and learning, 100% is the sweet spot.
Feeding ratios: what “1:1:1” actually means
Feeding ratios are written starter : water : flour (by weight).
Examples:
- 1:1:1 → 20 g starter + 20 g water + 20 g flour
- 1:2:2 → 20 g starter + 40 g water + 40 g flour
- 1:5:5 → 10 g starter + 50 g water + 50 g flour
Higher feeding ratios mean more fresh food relative to the amount of microbes, so fermentation takes longer and tends to be less sharply acidic.
The “acid load” concept (why small feeds can make starters sluggish)
If you feed too little flour/water relative to old starter (e.g., 1:0.5:0.5), you’re essentially bathing fresh flour in a lot of old acid. Yeast and many LAB strains slow down in very low pH conditions.
That’s why the peak-to-peak method usually works best with at least 1:2:2 once activity begins.
Temperature control: your starter’s accelerator pedal
Temperature affects:
- Microbial growth rate
- Enzyme activity (breaking starches into sugars)
- Acid production balance (lactic vs acetic)
The reliable range
For building and strengthening a starter, aim for:
- 24–27°C (75–81°F): ideal for consistent fermentation and balanced acidity
Common outcomes:
- Cooler (18–22°C / 64–72°F): slower rise, sometimes more acetic/vinegary notes
- Warmer (28–30°C / 82–86°F): faster fermentation, can skew sour, may weaken structure if too hot
- Too hot (above ~32°C / 90°F): risk of stressing microbes; can favor unwanted bacteria
Simple ways to control temperature at home
You don’t need a proofer. Try:
- Oven with the light on (but verify temperature; some ovens get too warm)
- Microwave as a proof box with a mug of hot water placed beside the jar
- Top of the fridge (often a few degrees warmer)
- A small insulated cooler with a warm gel pack or warm water bottle
Use a cheap thermometer if you can. Starters are surprisingly sensitive to “a few degrees.”
Jar size, cleanliness, and the mold question
Jar size matters more than people think
A jar that’s too small leads to messy overflow and makes it hard to judge peak. Too large and you may not see rise clearly.
A good rule:
- Use a jar that can hold at least 4–5× your starter’s post-feeding volume.
If you keep 60–100 g starter after feeding, a 500–750 ml jar is comfortable.
Lid: airtight or breathable?
Both can work.
- Loosely covered (lid resting on top or lightly screwed on): reduces pressure, limits drying
- Cloth cover: allows more airflow but can dry out the surface and invite contamination
For reliability, a loose lid is usually best.
Cleanliness: clean, not sterile
Wash jars and tools well with hot soapy water and dry them. You don’t need to sanitize like a canning project, but you do want to minimize stray mold spores and food residue.
Mold prevention 101
Mold is fuzzy, often colored (green, blue, pink, black), and tends to grow on the surface.
To reduce mold risk:
- Don’t let starter sit unfed for long periods in warm temps.
- Use a clean jar periodically (especially if dried starter crust builds up near the rim).
- Avoid cloth covers in very humid or mold-prone environments.
If you see mold: for home safety, the conservative recommendation is to discard the starter and start over. Mold can send microscopic threads below what you can see.
Understanding “hooch,” bad smells, and false starts
Hooch (gray/brown liquid)
Hooch is usually a sign of hunger: fermentation consumed available sugars, and liquid separates. It’s common and not inherently dangerous.
What to do:
- Pour it off (for less acidity) or stir it in (for more tang)
- Feed at a higher ratio (e.g., switch from 1:1:1 to 1:3:3)
- Keep warmer if your room is cold and fermentation is dragging
“Nail polish remover” smell
That acetone-like smell often appears when a starter is underfed and stressed. The fix is nearly always:
- More frequent feeding or higher feeding ratio
- Warmer temperature
Day 2–4 “crazy rise” that disappears
New starters often show dramatic bubbling early on due to a changing microbial population, including bacteria that produce gas but won’t dominate long-term.
This is normal. Don’t declare victory—or failure—based on early theatrics.
The method: a peak-to-peak starter build that prioritizes reliability
What “peak-to-peak” means
A starter rises after feeding, reaches maximum volume, then begins to fall.
- Peak: highest rise, domed top, lots of bubbles, maximum aeration
- Post-peak: top flattens, starter begins to recede, streaks appear on the jar
Peak-to-peak feeding means: feed your starter at peak or just after peak consistently. This trains the culture to ferment strongly and predictably.
Clock-based schedules (like “every 12 hours”) can be fine, but only if your temperature and ratio are stable. Peak-to-peak adapts automatically to your conditions.
Equipment checklist (minimal, but effective)
- Digital scale (1 g resolution is fine)
- One or two jars (500–750 ml recommended)
- Spoon or small spatula
- Rubber band or marker (to mark the starting level)
- Optional: thermometer
Flour choices: what to use for a strong starter
Best flours for building strength
- Whole rye: extremely reliable—high minerals (ash content) and enzymes; often ferments vigorously
- Whole wheat: also excellent; good nutrients for microbes
All-purpose or bread flour?
Works well, especially once the starter is established, but can be slower during the first week.
Practical approach
Many bakers use a small percentage of rye for robustness while keeping the starter mostly wheat:
- 80–90% bread/AP flour + 10–20% rye
This can improve consistency without locking you into a strongly rye-flavored culture.
Step-by-step: building a starter from scratch (with real ratios)
This plan assumes 100% hydration and aims to prevent two common problems: underfeeding and temperature mismatch.
Day 1: Create the seed culture
In a clean jar, mix:
- 20 g whole rye flour (or whole wheat)
- 20 g water (room temp; ideally 24–27°C / 75–81°F)
Stir until smooth. Scrape down sides. Mark level with a rubber band.
Cover loosely and keep warm.
Goal: hydrate flour, begin microbial succession.
Day 2: First refresh (don’t overreact)
You may see bubbles or smell something odd (cheesy, grassy, even a bit funky). That’s normal.
Discard down to 20 g starter, then add:
- 20 g water
- 20 g flour
This is a 1:1:1 feed. At this stage, the culture is young; we’re keeping it simple and not diluting too hard.
Day 3–4: Move toward strength
Repeat: discard to 20 g and feed 1:2:2:
- 20 g starter
- 40 g water
- 40 g flour
If your kitchen is cool (below ~22°C/72°F), stick with 1:1:1 for another day or two or keep it warmer. If it’s warm and it’s peaking quickly (under ~8 hours), go to 1:3:3.
Day 5–7: Start peak-to-peak
Now watch for the full rise cycle:
- It should rise noticeably (ideally doubling) and then begin to fall.
Feed when it peaks or just after.
A very common stable feed at this point is:
- Keep 15 g starter
- Add 45 g water
- Add 45 g flour
That’s 1:3:3.
If it peaks too fast (like 4–6 hours), increase ratio to 1:5:5. If it takes too long (more than ~18–24 hours), lower the ratio (1:2:2) and/or warm it.
When is it “ready to bake”?
A practical readiness test:
- At 24–27°C (75–81°F), after a 1:3:3 feed, it doubles or more within 6–10 hours for two to three cycles in a row.
The old “float test” (a spoonful floats in water) is inconsistent because flotation depends on bubble structure and flour choice. Rise timing is more reliable.
Peak cues: how to tell where you are in the fermentation cycle
Use these sensory markers (much more useful than guessing):
At peak
- Volume: at maximum (often 2–3×)
- Surface: domed or gently rounded
- Bubbles: plentiful and evenly distributed; sides show honeycomb structure
- Aroma: pleasantly tangy, yogurty, fruity, lightly alcoholic
- Texture: aerated, mousse-like
Post-peak (time to feed if you want strength)
- Surface begins to flatten
- Starter starts to recede from the high-water mark
- Streaks on jar interior show it has begun falling
- Aroma becomes sharper, more acidic, sometimes more alcoholic
Over-fermented (waited too long)
- Collapsed and runny
- Strong solvent/alcohol smell
- Separation/hooch
This isn’t “ruined,” but it’s a sign you’re missing the ideal feeding window. Adjust ratio/temperature to bring peaks into a predictable rhythm.
A simple peak-to-peak feeding schedule you can actually live with
The best schedule is the one your starter naturally supports at your temperature.
The baseline maintenance feed (room temperature, active baking)
Keep your starter around 60–120 g total.
Option A (common and stable): 1:3:3
- 20 g starter
- 60 g water
- 60 g flour
Feed at peak.
Option B (if peaking too fast): 1:5:5
- 10 g starter
- 50 g water
- 50 g flour
Converting peaks into a predictable routine
- If it peaks every ~8–12 hours: you can feed twice daily.
- If it peaks every ~12–24 hours: you can feed once daily.
The trick: choose the ratio that makes peak happen at a convenient interval.
Example: If you want a once-daily schedule but your starter peaks in 8 hours at 1:3:3, raise to 1:5:5 or keep it slightly cooler.
The “bake tomorrow” build (strong levain without guesswork)
The night before mixing dough, build what you need using the same logic:
- Choose a ratio that peaks around when you plan to mix.
Example (mix at 9am, kitchen ~25°C/77°F):
- 10pm: 10 g starter + 50 g water + 50 g flour (1:5:5)
- By 8–9am: near peak, ready to mix
How to avoid sluggish fermentation (and fix it fast)
Sluggish starters usually come from one or more of:
- Too cold
- Underfeeding (low ratio)
- Using very refined flour only during early stages
- Feeding before it has peaked repeatedly (never allowing a strong cycle)
The “3-day tune-up” (works for many weak starters)
For 3 days, keep it warm (24–27°C / 75–81°F) and do peak-to-peak feeds.
- Start with a clean jar.
- Feed 1:3:3 at peak.
- If it peaks in under 6 hours, increase to 1:5:5.
- Include 10–20% rye or whole wheat in the flour portion.
This often restores predictable doubling.
Troubleshooting guide (quick diagnosis)
Problem: Hooch on top every day
Cause: underfeeding or too warm for your ratio.
Fix: switch to 1:4:4 or 1:5:5; feed at peak; keep slightly cooler.
Problem: It never rises much, only bubbles
Cause: too wet (hard to trap gas), too cold, or immature culture.
Fix: verify temperature; try 10–20% rye; ensure thick pancake-batter consistency at 100% hydration; feed peak-to-peak for several cycles.
Problem: Smells putrid or like garbage
Cause: early-stage bacteria succession or severe neglect.
Fix: if no mold, move to higher ratio (1:5:5) and warm temps; use whole grain; change jar.
Problem: Pink/orange streaks or fuzzy growth
Cause: contamination.
Fix: discard and restart (safest approach).
How to pause your starter (without killing it)
If you bake once a week (or less), keep the starter in the refrigerator.
Refrigerator maintenance method (simple and reliable)
- Feed at 1:3:3 or 1:5:5.
- Let it sit at room temp 1–2 hours to start fermentation (a small head start).
- Refrigerate with a loose lid.
Most starters can go 5–10 days this way without trouble.
Weekly routine example
- Day before baking: take from fridge, feed at 1:3:3, keep warm, feed again at peak if needed.
- Bake day: use at peak.
- After baking: feed again, wait 1–2 hours, refrigerate.
Why fridge works
Cold slows yeast and LAB dramatically. You’re essentially putting the ecosystem on standby.
Reviving a neglected starter (sluggish, hoochy, or long-fridged)
If it’s been sitting for weeks, expect a couple days of refreshment.
Revival protocol
- Pour off hooch if present.
- Take a small inoculation: 10 g starter (from beneath any discolored surface).
- Feed 1:5:5 (10 g starter + 50 g water + 50 g flour).
- Keep warm (24–27°C / 75–81°F).
- Feed again at peak.
Repeat 2–4 cycles until it returns to predictable doubling. If you smell strong acetone, keep using higher ratios and warm temps.
If you see mold: discard.
Practical examples: adjusting ratios like a pro
Example 1: Your kitchen is cold (20°C / 68°F)
At 20°C, fermentation slows. If you try to force a 12-hour schedule with a big ratio, you may never see a clear peak.
Try:
- Keep warm using a DIY proof box, or
- Use a smaller ratio temporarily (1:2:2)
Once the starter strengthens, you can return to 1:3:3.
Example 2: Your starter peaks in 5 hours and then collapses
That’s often a sign the ratio is too small for your temperature.
Try:
- Move from 1:3:3 to 1:5:5
- Or feed more often (peak-to-peak might become twice daily)
Example 3: You want a milder, less sour profile
Sourness is influenced by time, temperature, and ratio.
For milder starter/levain:
- Feed at higher ratios (1:5:5 or 1:10:10)
- Use warmer-but-not-hot temps (around 26–27°C / 79–81°F)
- Use the starter at or near peak, not long after
Cultural and expert context (why this method aligns with baking science)
The peak-to-peak approach maps well to what we know from fermentation science: microbial communities stabilize when they are regularly transferred into fresh substrate at a point where desired organisms are abundant and active.
In practical baking terms, many professional bakers maintain “chef,” “levain,” or “mother” cultures by feeding on a rhythm that matches their bakery temperature and production schedule—often refreshing when the culture is mature, airy, and near maximum expansion.
If you want deeper dives into the microbiology and practical craft, respected resources include:
- “The Taste of Bread” by Raymond Calvel (classic work on fermentation and bread flavor)
- “Flour Water Salt Yeast” by Ken Forkish (approachable methods and schedules)
- “Tartine Bread” by Chad Robertson (popularized warm, active levain management)
- Food fermentation writers like Sandor Ellix Katz (broad fermentation principles)
You don’t need to memorize any one author’s routine. The point is to understand why starters behave as they do—then choose ratios and temperatures that produce consistent peaks.
Safety notes (common sense, not fear)
Sourdough is generally safe because acidity inhibits many pathogens. Still:
- Discard if you see mold or suspicious colored growth (pink/orange/fuzzy).
- Use clean equipment.
- If it smells truly rotten and doesn’t improve with a couple days of proper feeding, restart.
Starting over is not failure; it’s often the fastest path to confidence.
The “no-fail” summary (print this in your head)
If you only remember a few rules, make them these:
- Weigh everything. Hydration and ratios must be by weight.
- Aim for 24–27°C (75–81°F) for building and strengthening.
- Feed peak-to-peak, not by the clock.
- Use enough food: once active, prefer 1:3:3 or higher.
- Use a jar big enough for 3× rise and mark the level.
- Hooch means hungry, not dead. Mold means restart.
- To pause, feed and refrigerate; to revive, small inoculation + big feed.
Get those right and your starter stops being mysterious. It becomes a dependable ingredient—one you can schedule, strengthen, and adjust like any other part of cooking.
Quick reference: ratio table (100% hydration)
| Ratio (S:W:F) | Example amounts | Typical use |
|---|---|---|
| 1:1:1 | 20g:20g:20g | Early days; very frequent feeding |
| 1:2:2 | 20g:40g:40g | Strengthening in cooler temps |
| 1:3:3 | 20g:60g:60g | Reliable daily maintenance in warm-ish kitchens |
| 1:5:5 | 10g:50g:50g | Slows peak; good for warm kitchens or overnight builds |
| 1:10:10 | 5g:50g:50g | Very mild builds; longer fermentation windows |
(Adjust based on temperature and when you want peak.)
Final encouragement: consistency beats perfection
Starters reward steady habits more than fancy tricks. If your feeding math is sound, your temperature is reasonable, and you feed at peak, your starter will become robust—even if you miss a feed here and there.
Treat it like a living pantry staple: predictable inputs, predictable outputs. Before long, you’ll know your starter’s rhythm by sight and smell, and “will it rise?” won’t be a question anymore—it’ll be a given.