Fish That Never Sticks: The “Dry‑Brine + Hot Pan + Gentle Release” Method for Crisp Skin on Salmon, Cod, and Pollock (Plus a Sauce Timing Guide)
RecipeSimpli
The problem: fish sticks, tears, and turns pale
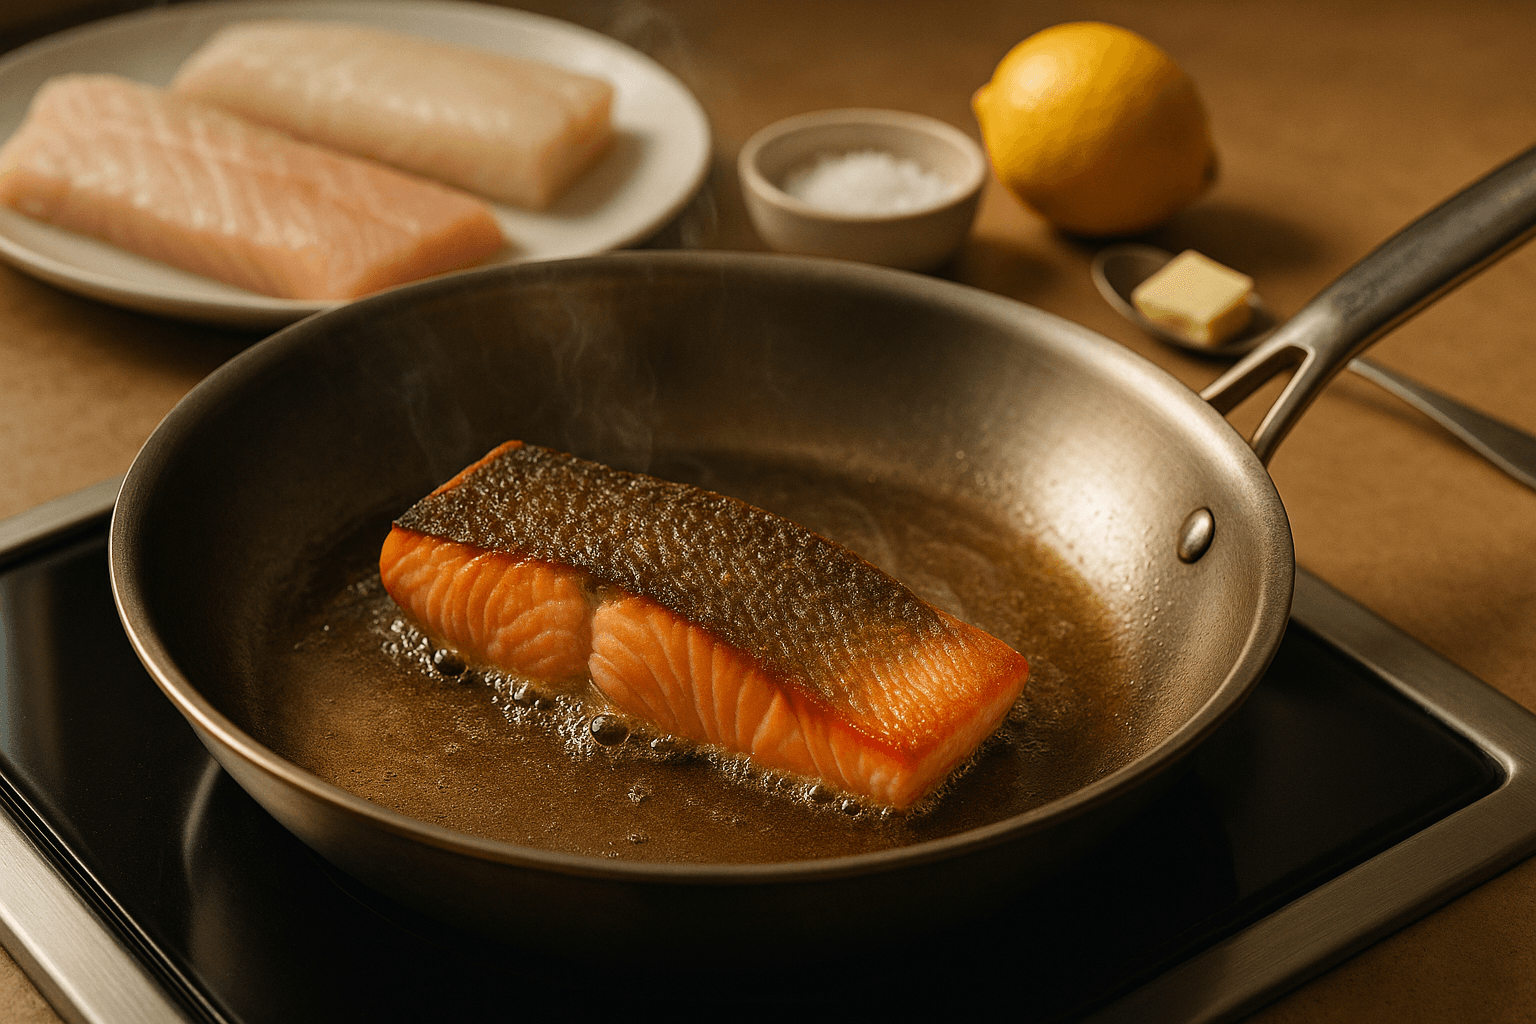
Pan-searing fish at home often goes like this: you place a fillet in the pan, it immediately grabs the surface like glue, and when you try to flip it, the skin rips off or the flesh flakes apart. Even when it doesn’t tear, the outside can look gray and steamed rather than browned and crisp.
The fix is not a single trick (like “more oil” or “nonstick only”). It’s a sequence—a method that pairs moisture control with the right heat and a patient flip. This article lays out a reliable workflow you can use on:
- Salmon (especially skin-on): crisp skin, juicy interior.
- Cod: delicate, lean, prone to sticking and breaking.
- Pollock: lean and flaky; great practice fish that behaves similarly to cod.
The core method is:
- Dry-brine (salt at the right ratio, for the right time).
- Hot pan (preheat correctly; choose the right oil).
- Gentle release (wait until the fish naturally unsticks before flipping).
Then we’ll add a sauce timing guide so you can finish with a pan sauce that’s glossy and stable—not broken, oily, or scorched.
Why fish sticks (and why the “wait” works)
Fish sticks for a few overlapping reasons:
- Surface proteins bond to the pan. When raw fish hits hot metal, proteins at the surface denature and can adhere, especially if the fish is wet.
- Water is the enemy of browning. Moisture must evaporate before the surface temperature can rise above the boiling point and start browning (the Maillard reaction). A wet fillet steams, and steaming encourages sticking.
- The crust hasn’t formed yet. Early in searing, the fish is fragile and actively bonding. Once a browned crust (or crisped skin) forms, the fish releases more easily.
This is why experienced cooks say: “If it’s sticking, it’s not ready.” The pan hasn’t magically become nonstick—rather, a crust has formed and the food can lift cleanly.
A well-known parallel is steak searing; fish is simply more delicate, so timing and moisture control matter even more.
The method at a glance (a repeatable checklist)
For most fillets (6–8 oz, ~1 inch thick)
- Dry-brine: salt at 0.8–1.0% of fish weight (or a practical pinch method), rest 15–45 minutes.
- Dry again: blot thoroughly; optional fridge-air-dry 15–60 minutes for extra crisp.
- Preheat pan: stainless or carbon steel, medium-high until oil shimmers.
- Add oil: choose a high-smoke-point oil; use enough to thinly coat.
- Place fish: lay away from you; press gently 5–10 seconds to prevent curl.
- Don’t move it: sear until it releases.
- Flip once: cook briefly on the second side; finish gently.
- Rest briefly: 1–3 minutes.
Now let’s make each step foolproof.
Step 1: Moisture control starts before heat—dry-brining that actually helps
Dry-brining is often described as “seasoning in advance.” For fish, it’s more than that: it changes surface behavior.
What salt does to fish (in practical terms)
- Salt draws a little moisture to the surface at first.
- Given a short rest, that salty moisture partially reabsorbs.
- Proteins loosen slightly, helping the fish hold onto moisture during cooking.
- Meanwhile, you get more even seasoning and a surface that can brown more predictably.
This is widely discussed in food science writing and culinary education: salting in advance improves seasoning penetration and affects protein structure. The key for fish is time and dose—too much salt or too long can start to “cure” the flesh and make it firmer.
The reliable ratio: 0.8–1.0% salt by weight
If you own a kitchen scale, use it once and you’ll internalize the amount.
- Weigh fish in grams.
- Multiply by 0.008 to 0.010.
- That number is grams of salt.
Example: 300 g salmon fillet
- 300 × 0.009 = 2.7 g salt
If you don’t use a scale, aim for a light, even dusting—more like seasoning eggs than seasoning a roast.
Timing guide (by fish type)
- Salmon (skin-on): 20–45 minutes. Thick, fatty fish is forgiving.
- Cod: 15–30 minutes. Lean and delicate—don’t push too long.
- Pollock: 10–25 minutes. Often thinner; salt acts fast.
Where to rest it
- Place fish on a plate or small rack.
- Leave uncovered or loosely covered.
- If you have fridge space, uncovered in the fridge helps surface drying (similar in spirit to air-drying poultry skin).
A note on sugar and spices
For this method, keep the brine simple:
- Salt only before searing.
- Add sugar, paprika, pepper, or spice rubs after searing or at the end—many spices burn in a hot pan and create bitter flavors.
Step 2: The second dry—blotting is not optional
After dry-brining, you must remove surface moisture.
How to blot properly
- Use paper towels or a clean kitchen towel.
- Pat every surface—especially the skin side.
- If using skin-on salmon: blot until the skin feels tacky, not slick.
Why it matters: water must evaporate before browning can begin. If the surface is wet, the pan spends its energy boiling water instead of crisping skin.
Optional “air-dry” for showpiece crisp skin
If you want restaurant-level salmon skin:
- After blotting, set the fish on a rack.
- Refrigerate uncovered 30–60 minutes.
This improves dryness and reduces splattering.
Step 3: Pan choice—stainless, carbon steel, cast iron, or nonstick?
You can succeed with several pans, but each has a best use.
Stainless steel (best all-around)
- Great browning.
- Great for pan sauces (fond forms, deglazes cleanly).
- Requires correct preheat and patience for release.
Carbon steel (excellent once seasoned)
- Heats quickly, good nonstick properties when well-seasoned.
- Also builds fond, though it can be more reactive than stainless.
Cast iron (great heat retention)
- Excellent for crisp skin.
- Slower to respond to heat changes.
- Pan sauces work, but acidity plus long simmers can affect seasoning.
Nonstick (best for very delicate fish, but limited sauce options)
- Most forgiving for cod/pollock.
- Less browning; minimal fond.
- Avoid high heat; many coatings don’t like sustained high temperatures.
If you’re building confidence, nonstick is a valid training wheel. But if you want crisp skin + pan sauce, stainless is the classic move.
Step 4: Oil choice and how much to use
Choose an oil that tolerates heat
Good options:
- Avocado oil
- Grapeseed oil
- Canola oil
- Rice bran oil
- Light olive oil (refined, not extra-virgin)
Avoid using butter alone at the start; it can burn before your fish is ready. You can add butter later for basting or sauce.
How much oil?
Use enough to create a thin, continuous film:
- For a 10–12 inch pan: 1–2 tablespoons
You’re not deep-frying. Too little oil encourages sticking; too much oil can make the fish feel greasy and can shallow-fry the sides unevenly.
Step 5: Heat cues—how to know the pan is actually ready
Most sticking problems come from the pan not being properly preheated.
Visual cue: shimmering oil
- Heat the dry pan over medium-high for 2–3 minutes (varies by stove).
- Add oil.
- When the oil shimmers and flows quickly as you tilt the pan, it’s ready.
Audio cue: an immediate, confident sizzle
When the fish hits the pan, you want a strong sizzle—more than gentle bubbling, less than violent smoking.
If your pan is smoking hard
- Reduce heat slightly.
- Wipe out burned oil (carefully) and add fresh oil.
Burned oil tastes bitter and can create a sticky varnish.
Step 6: Placement, pressing, and the first minute
Place fish away from you
Lay the fish into the pan starting at the edge farthest from you and lowering it toward you to prevent oil splashes.
Press gently to prevent curling
Fish—especially salmon skin—can contract and curl. Use a spatula or fish turner to press the fillet for 5–10 seconds right after it goes in.
This improves pan contact and promotes even crisping.
Do not poke, slide, or “check” early
Movement tears developing crust. If you want to verify progress, use your senses:
- Listen: sizzling should gradually soften.
- Look: the cooked band will climb up the sides.
Step 7: The “gentle release”—exactly when to flip
This is the heart of the method.
The rule
Don’t flip until the fish releases when nudged.
How to test:
- Slide a thin fish spatula under one edge.
- If it resists, stop and wait 30–60 seconds.
- When it’s ready, the spatula will glide underneath with minimal tearing.
Time ranges (approximate)
These vary by thickness, pan, and heat, but they’ll orient you.
Salmon (skin-on)
- Skin side first.
- 70–90% of cooking time on the skin side.
- For a 1-inch fillet: 5–7 minutes skin side, then 30–90 seconds flesh side.
Cod and pollock
- If one side has a “presentation side,” start there.
- For a 1-inch fillet: 3–5 minutes first side, then 1–2 minutes second side.
What you should see
- A golden-brown crust on the first side.
- The cooked, opaque area creeping upward.
- Less vigorous bubbling as surface moisture reduces.
Common mistake: flipping too soon, then turning repeatedly
Frequent flipping can work for some proteins, but delicate fish benefits from one confident flip after a proper crust forms.
Step 8: Finish gently—carryover cooking is real
Fish overcooks quickly, especially lean fillets.
Practical doneness cues
- Salmon: center should still look slightly translucent if you want it juicy (medium). If you prefer fully cooked, aim for barely translucent then rest.
- Cod/pollock: turns opaque and flakes, but remove from heat just before it starts separating into large flakes on its own.
If you use an instant-read thermometer:
- Salmon: 120–130°F (49–54°C) for moist/medium; 135–140°F (57–60°C) for firmer.
- Cod/pollock: 125–135°F (52–57°C); lean fish dries out fast beyond that.
Rest
Rest 1–3 minutes; it stabilizes juices and finishes the interior gently.
Species-specific playbook
A) Salmon: crisp skin that shatters
Best approach: skin side down, longer sear, minimal flipping.
Steps:
- Dry-brine 20–45 min (0.8–1.0% salt).
- Blot aggressively; optional fridge air-dry.
- Stainless or cast iron, medium-high.
- Oil, then salmon skin side down.
- Press 10 seconds.
- Cook 5–7 minutes (1-inch), until release.
- Flip, cook 30–90 seconds.
- Optional: butter baste with aromatics (thyme/garlic) briefly after flipping.
Tip: If the skin isn’t crisp, it’s almost always because the skin was damp or the pan wasn’t hot enough.
B) Cod: keep it intact, keep it moist
Cod is tender and lean; it benefits from a slightly gentler heat once the sear is established.
Steps:
- Dry-brine 15–30 min.
- Blot thoroughly.
- Medium-high preheat; add oil.
- Place cod; press gently.
- After initial sear, consider dropping heat to medium to finish without toughening.
Tip: Cod often has a fragile “flake structure.” Use a fish spatula, and support the fillet from underneath when flipping.
C) Pollock: the weeknight workhorse
Pollock is often thinner and can overcook fast.
Steps:
- Dry-brine 10–25 min.
- Blot.
- Slightly lower heat than salmon if fillets are thin.
- Sear quickly; flip once.
Tip: Because it’s mild, pollock shines with a bright pan sauce (lemon-caper, quick tomato, or mustard).
Troubleshooting: what went wrong and how to fix it next time
“It stuck and tore.”
Most common causes:
- Pan not preheated enough.
- Fish surface too wet.
- Tried to flip before release.
Fix: Dry more, preheat longer, wait for release.
“The skin is chewy, not crisp.”
Causes:
- Skin wasn’t dried well.
- Heat too low.
- Too much moisture in the pan (crowding).
Fix: Air-dry skin, cook one fillet at a time, ensure shimmering oil.
“It’s crisp but greasy.”
Causes:
- Too much oil.
- Oil not hot enough (fish absorbs oil when it’s lukewarm).
Fix: Use less oil; preheat until shimmer.
“The outside burned before the inside cooked.”
Causes:
- Heat too high for thickness.
- Sugar/spice rub burning.
Fix: Start medium-high to set crust, then lower to medium; add sweet/spicy coatings later.
“White gunk (albumin) poured out of my salmon.”
That white protein is albumin, and it appears more with high heat or overcooking.
Fix: Dry-brine helps; also cook slightly gentler and don’t overcook.
The sauce timing guide: glossy, fast pan sauces that don’t break
A great fish sear is only half the story. The pan after searing contains:
- Rendered fat (especially from salmon)
- Oil
- Fond (browned bits)
A pan sauce works when you control fat, heat, and emulsification.
The cardinal rule: remove fish before making the sauce
Fish is delicate. If you make a sauce with the fish still in the pan, you’ll often:
- Overcook the fish while reducing.
- Break the fillet while stirring.
So:
- Move fish to a warm plate.
- Make sauce in the pan.
- Return fish briefly (or spoon sauce over) at the end.
Step-by-step sauce workflow (works for most quick sauces)
- Assess fat:
- If there’s a lot of oil/fat in the pan, pour off until you have about 1–2 teaspoons left.
- Aromatics (optional):
- Add minced shallot/garlic; cook 15–30 seconds.
- Deglaze:
- Add wine, vermouth, stock, lemon juice, or a mix.
- Scrape fond with a wooden spoon.
- Reduce briefly:
- Simmer until slightly syrupy.
- Finish off-heat:
- Whisk in cold butter a piece at a time, or add cream/yogurt carefully.
- Season at the end:
- Taste for salt and acid.
Why sauces “break” (and how to prevent it)
A butter pan sauce is an emulsion: tiny droplets of fat suspended in water-based liquid.
Sauces break when:
- Heat is too high (fat separates).
- There’s too much fat relative to liquid.
- You boil after adding butter.
Fix: Reduce first, then turn heat low/off to mount butter.
Three fast pan sauces (with exact timing)
Each of these is designed to fit into the fish workflow without stress.
1) Lemon–Caper Brown Butter (best with salmon and cod)
Flavor: nutty, bright, briny.
Timing: make after fish comes out.
Ingredients (serves 2):
- 2 tbsp unsalted butter
- 1 tbsp capers, drained
- 1–2 tbsp lemon juice
- Optional: 1 tsp minced parsley
Method:
- Pour off excess oil, leaving a thin film.
- Add butter over medium heat; let it foam and turn light hazelnut brown.
- Add capers; sizzle 10–20 seconds.
- Turn heat off; add lemon juice (careful—will sputter).
- Spoon over fish; finish with parsley.
Don’t: walk away while browning butter. It goes from perfect to burnt quickly.
2) White Wine–Shallot “Classic” (glossy and stable)
Flavor: elegant, restaurant-style; ideal for pollock/cod.
Ingredients:
- 1 small shallot, finely minced
- 1/3 cup dry white wine (or vermouth)
- 1/3 cup fish stock/chicken stock (or water)
- 2–3 tbsp cold butter, cubed
- Lemon zest or a squeeze of lemon
Method:
- Remove fish; pour off excess fat.
- Add shallot with a tiny pinch of salt; cook 30–60 seconds.
- Add wine; reduce by about half.
- Add stock; reduce until slightly syrupy.
- Turn heat low/off; whisk in cold butter cubes.
- Finish with lemon zest/juice.
Key cue: after adding butter, the sauce should be steamy, not boiling.
3) Mustard–Cream Pan Sauce (hard to break; great for lean fish)
Flavor: tangy, cozy, weeknight-friendly.
Ingredients:
- 1 tsp Dijon mustard
- 1/2 cup cream (or evaporated milk)
- Splash of stock or water
- Black pepper
- Optional: dill or tarragon
Method:
- Remove fish; reduce heat to medium-low.
- Deglaze with a splash of stock/water; scrape fond.
- Stir in cream; simmer gently 1–2 minutes.
- Whisk in Dijon off-heat.
- Pepper and herbs at the end.
Don’t: boil hard for long; it can tighten the sauce and dull the flavor.
Cultural and culinary context: why this method shows up everywhere
Across cuisines, the same principles recur:
- French technique emphasizes proper searing and pan sauces (deglazing, reduction, mounting with butter).
- Japanese cooking often prizes crisp skin and careful heat control for fish (think of salt-grilled preparations where surface dryness and timing are central).
- Nordic and coastal cuisines frequently pair lean white fish with butter, acid, and herbs—flavors that highlight freshness while adding richness.
The shared lesson is that fish cookery is less about force and more about controlled transitions: dry to hot, hot to release, release to gentle finish.
A complete example: crisp-skin salmon with a 6-minute sauce window
Goal: dinner for two, minimal stress.
- T–45 min: Salt salmon (0.9% by weight). Leave uncovered in fridge.
- T–10 min: Pull salmon; blot dry.
- T–5 min: Preheat stainless pan; add oil.
- T–0: Salmon in, skin side down; press 10 seconds.
- T+5 min: Test release; if ready, flip 45 seconds.
- T+6 min: Remove salmon to plate.
- T+6:30: Pour off excess fat; add butter and capers.
- T+7:30: Off-heat lemon juice; spoon sauce over salmon.
Result: crisp skin, moist interior, glossy sauce.
Quick reference: the stick-proof rules
- Dry-brine: 0.8–1.0% salt by weight; 15–45 minutes.
- Dry thoroughly: blot; optional fridge air-dry.
- Hot pan, then oil: heat until oil shimmers.
- Place and press: 5–10 seconds to prevent curl.
- Don’t move it: wait for crust.
- Flip only when it releases.
- Sauce after fish comes out: reduce first, finish with butter off-heat.
Master that sequence and “fish that never sticks” stops being a lucky night—it becomes your default.