Thin Sliced Chicken Breast Recipes That Stay Juicy: The 3‑Step “Brine‑Dust‑Flash Sear” Method + Timing Chart for Stovetop, Oven, and Air Fryer
RecipeSimpli
Thin-sliced chicken breast is one of the fastest proteins you can cook on a weeknight—and also one of the easiest to ruin. Because cutlets are so lean and so thin, the window between juicy and tender and dry and chalky can be a matter of a minute.
The fix isn’t complicated, but it does require a method that respects what thin chicken needs: a little insurance for moisture, a little help with browning, and a cooking approach built around speed.
This article lays out a reliable system you can use with almost any seasoning profile:
- Brine (quick) – seasons the meat throughout and boosts moisture retention.
- Dust (light starch) – improves browning, protects the surface, and creates a sauce-friendly exterior.
- Flash sear (high heat + precise timing) – cooks through quickly without drying out.
You’ll also get a timing chart for stovetop, oven, and air fryer, plus flavor variations and meal-prep strategies so you can turn cutlets into multiple dinners with minimal effort.
Why thin chicken cutlets dry out so easily
Chicken breast is naturally low in fat and rich in moisture-loving proteins. When it’s overcooked, those proteins tighten up, squeeze out water, and you’re left with a dense, dry bite.
Thin cutlets are especially vulnerable because:
- They heat through extremely fast. Carryover cooking (the temperature rise after you remove it from heat) can push them past the finish line.
- The margin for error is tiny. A thick breast might forgive 3–5 extra minutes; a thin cutlet might not forgive 30–60 seconds.
- Surface area is high. More surface means more moisture loss and faster overcooking.
The approach here is influenced by widely taught food-science principles: salt improves water-holding capacity, starch coatings change surface behavior and browning, and high heat for short time reduces the duration that moisture can escape.
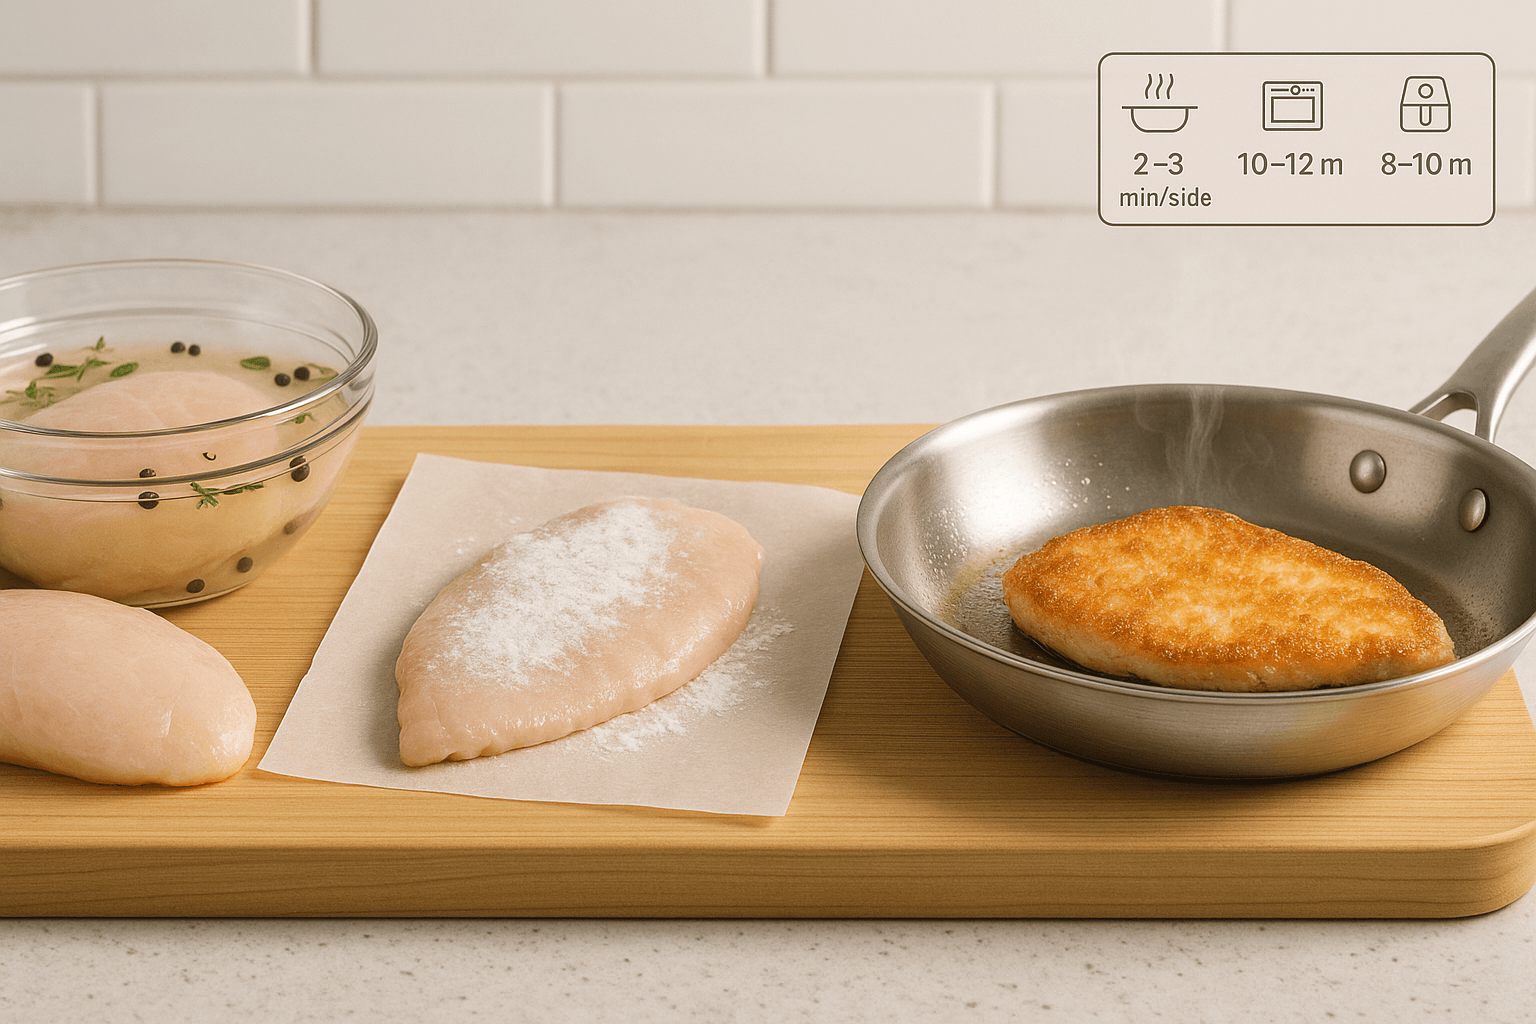
The 3‑Step “Brine‑Dust‑Flash Sear” method (core technique)
Step 1: Quick brine (15–30 minutes)
A brine is just salt dissolved in water. For thin chicken, you don’t need an overnight soak. A short brine gives you two big benefits:
- Better seasoning inside the meat, not just on the surface.
- Juicier texture because salt alters muscle proteins (notably myosin), helping them retain more water during cooking.
Quick brine formula (foolproof)
- 4 cups (1 liter) cold water
- 3 tablespoons kosher salt (or 1 1/2 tablespoons fine/table salt)
- Optional: 1 tablespoon sugar (helps browning and rounds flavor), peppercorns, garlic, lemon peel, bay leaf
Stir to dissolve. Add thin-sliced chicken breasts (cutlets). Refrigerate 15–30 minutes.
Don’t brine too long for thin cutlets—beyond about 45–60 minutes, the texture can trend “hammy,” especially if the cutlets are very thin.
Shortcut option: Dry brine (if you hate dealing with a bowl)
If you don’t want a wet brine, sprinkle both sides of the cutlets with about 1% salt by weight (roughly 1/2 teaspoon kosher salt per 8 oz / 225 g chicken, depending on crystal size). Let sit 15–30 minutes uncovered in the fridge. Pat dry before dusting.
Step 2: Dust with starch (light, not a thick breading)
After brining, pat the chicken very dry with paper towels. Surface water blocks browning and encourages steaming.
Then dust lightly with a starch:
- Cornstarch: crisp, light, great for glossy pan sauces.
- Potato starch: extra crisp, excellent in the air fryer.
- Rice flour: delicate crunch, very even browning.
- All-purpose flour: classic, slightly more “breaded” feel.
Use about 1–2 teaspoons starch per cutlet, just enough to create a thin, even veil. Shake off excess.
Why this works:
- Starch absorbs surface moisture and forms a thin gel layer when heated.
- It improves Maillard browning (the complex reaction that creates savory, roasted flavors) by promoting an evenly drying surface.
- It creates a sauce-friendly exterior that helps liquids cling.
If you want extra flavor, mix into the starch:
- 1/2 teaspoon garlic powder
- 1/2 teaspoon paprika
- Black pepper
- A pinch of cayenne
Keep it light—this is not full-on fried chicken.
Step 3: Flash sear with precise timing
“Flash sear” means high heat, short cook time, and minimal flipping.
Key rules:
- Preheat the pan well. If the pan isn’t hot, the chicken sits longer and dries out.
- Use enough fat. A thin film of oil (and optional butter at the end) improves heat transfer and browning.
- Don’t crowd. Crowding drops pan temperature and causes steaming.
- Pull by temperature, not just time. Thin cutlets finish fast.
Target internal temperature:
- USDA guidance is 165°F / 74°C for poultry.
- For thin cutlets, many cooks pull at 160–162°F (71–72°C) and rest 3 minutes; carryover and rest time bring it safely to the goal.
If you don’t have a thermometer, use the visual cue: the thickest part should be opaque with clear juices, not pink, and the cutlet should feel springy, not firm.
Timing chart: stovetop, oven, air fryer
Thickness is the deciding factor. Thin-sliced chicken cutlets vary from about 1/4 inch (6 mm) to 1/2 inch (12 mm). If yours are uneven, lightly pound them between parchment sheets to an even thickness.
Assumptions for the chart: brined, patted dry, lightly dusted, cooked from refrigerator-cold. If chicken is closer to room temp, times may shorten slightly.
Stovetop (best for browning + sauce)
Method: skillet, medium-high to high heat, 1–2 teaspoons oil per batch.
| Cutlet thickness | Heat setting | Time side 1 | Time side 2 | Notes |
|---|---|---|---|---|
| 1/4 in (6 mm) | High | 60–90 sec | 45–75 sec | Pull at 160–162°F; rest 3 min |
| 3/8 in (9 mm) | Med-high | 90–120 sec | 60–90 sec | Adjust if pan runs hot |
| 1/2 in (12 mm) | Med-high | 2–3 min | 1.5–2.5 min | Consider brief lid cover last 30 sec |
Pro tip: If browning is happening too fast before the center cooks, lower heat slightly and add a teaspoon of oil to stabilize pan temp.
Oven (best for hands-off batches)
Method: preheated sheet pan, high heat.
| Cutlet thickness | Oven temp | Time | Notes |
|---|---|---|---|
| 1/4 in (6 mm) | 450°F / 232°C | 6–8 min | Flip at 4 min if you want even color |
| 3/8 in (9 mm) | 450°F / 232°C | 8–10 min | Bake to 160–162°F then rest |
| 1/2 in (12 mm) | 450°F / 232°C | 10–12 min | Consider finishing with 1–2 min broil |
Pro tip: Preheat the pan in the oven for 5–7 minutes, then add oiled cutlets. The immediate sizzle mimics stovetop searing.
Air fryer (best for crisp edges, low mess)
Method: preheat air fryer, light oil spray.
| Cutlet thickness | Air fryer temp | Time | Notes |
|---|---|---|---|
| 1/4 in (6 mm) | 400°F / 204°C | 5–7 min | Flip halfway; don’t over-spray |
| 3/8 in (9 mm) | 400°F / 204°C | 7–9 min | Check early; models vary |
| 1/2 in (12 mm) | 390–400°F / 199–204°C | 9–11 min | Pull at 160–162°F; rest |
Pro tip: Potato starch or cornstarch dusting performs especially well here. Too much coating can blow off—keep it light.
The “juicy cutlet” master workflow (10 minutes active time)
Use this as your repeatable routine:
- Brine 15–30 min (while you prep sides or a sauce).
- Drain + pat dry thoroughly.
- Dust lightly with starch + season. (Remember: brine already seasons.)
- Cook fast using your chosen method.
- Rest 3 minutes. Slice after resting to reduce juice loss.
A common mistake is skipping the dry step. If the chicken is wet, your coating clumps and your pan cools—leading to steaming instead of searing.
Flavor variations (same method, different dinner)
The beauty of brine-dust-flash sear is that it’s a neutral technique. Once you own the method, you can pivot into different cuisines with small tweaks.
1) Lemon-garlic piccata vibes (stovetop)
Dust mix: cornstarch + black pepper + a pinch of garlic powder
After searing:
- Remove chicken.
- Add 1 tablespoon butter.
- Add 1/3 cup chicken stock, juice of 1 lemon.
- Scrape browned bits (fond).
- Stir in 1–2 tablespoons capers.
- Return chicken briefly to warm through.
Result: glossy, bright sauce that clings thanks to the starch film.
2) Japanese-inspired ginger-soy (air fryer or stovetop)
Add to brine (optional): a few slices ginger + a smashed garlic clove (keep salt concentration the same).
After cooking glaze:
- 2 tablespoons soy sauce
- 1 tablespoon mirin (or honey + splash of rice vinegar)
- 1 teaspoon grated ginger
- 1 teaspoon sesame oil
Simmer 30–60 seconds and brush on.
3) Mexican-ish taco cutlets
Dust mix: cornstarch + ground cumin + smoked paprika + chili powder
Serve sliced in tortillas with:
- shredded cabbage
- pico de gallo
- lime crema
4) Mediterranean oregano + feta salad plate
Dust mix: rice flour + dried oregano + black pepper
Serve with:
- chopped cucumbers and tomatoes
- olives
- feta
- lemon-olive oil dressing
5) “Parmesan without breading” cutlets
For a weeknight chicken parm feel without deep frying:
- Dust with flour + garlic powder
- Pan sear
- Top with marinara + mozzarella
- Broil 1–2 minutes
The light coating helps the sauce grab without turning the cutlet soggy.
Sauce and finishing ideas (fast, no fuss)
Thin cutlets shine when paired with quick pan sauces or toppings. Because they cook so fast, your sauce should be equally fast.
1) Brown butter + sage
After searing:
- Add 2 tablespoons butter to the pan.
- Let it foam and turn light brown.
- Add sage leaves.
- Spoon over chicken.
2) Creamy mustard pan sauce
- Lower heat.
- Add 1/2 cup stock.
- Add 2–3 tablespoons cream (or yogurt off heat).
- Whisk in 1 tablespoon Dijon.
3) Salsa verde / chimichurri (no-cook)
A bright herb sauce is ideal meal prep: spoon over reheated chicken to restore moisture and freshness.
Meal-prep strategy: cook once, eat 3 ways
Thin cutlets are perfect for meal prep because you can cook a batch quickly and repurpose it.
Batch plan (Sunday or weeknight)
- Brine 6–8 cutlets (work in batches if needed).
- Cook using oven or air fryer for efficiency.
- Cool quickly, store in airtight containers.
Storage:
- Refrigerate up to 3–4 days.
- Freeze up to 2–3 months (best sliced or portioned).
How to reheat without drying out
- Best: cover and warm gently with a splash of water/stock in a skillet.
- Microwave: low power (50–70%) in short bursts, covered.
- Avoid: blasting at full power until hot throughout.
Three quick dinners from one batch
- Chicken + grain bowl: rice/quinoa, roasted veg, tahini-lemon sauce.
- Salad upgrade: arugula, shaved parmesan, croutons, Caesar-style dressing.
- Sandwich: toasted roll, pesto or mayo, tomato, pickled onions.
Because the chicken is properly seasoned from brining, leftovers taste “complete,” not bland.
Common problems and fixes
“It’s still dry—what am I doing wrong?”
Most common causes:
- Overcooking by a minute. Use a thermometer and pull at 160–162°F.
- Cutlets are uneven thickness. Pound to even thickness.
- Heat too low. Low heat = longer cook time = more moisture loss.
“My coating is gummy or patchy.”
- Chicken wasn’t dried enough after brining.
- Too much starch. Dust lightly and shake excess.
“It’s browning too fast but not cooked through.”
- Pan is too hot or cutlets are thicker than expected.
- Lower heat slightly and cook 30–60 seconds longer.
“Air fryer coating blew off.”
- Too much powder or too strong a fan effect.
- Press coating gently onto the chicken and keep it very thin.
Practical equipment notes (what helps, what doesn’t)
- Instant-read thermometer: the single best tool for consistency.
- Heavy skillet (stainless or cast iron): better heat retention for fast searing.
- Tongs + paper towels: for controlled flipping and drying.
- Wire rack (optional): helps keep the coating dry before cooking.
Nonstick pans can work, but they often don’t brown as well at high heat and you’ll get less fond for sauces.
A few words of culinary science (why the method works)
If you like understanding the “why,” here’s the short version:
- Salt and protein behavior: In a brine, salt diffuses inward and changes how muscle proteins bind water. This is one reason brined meats stay juicier even when cooked to safe temperatures.
- Surface dryness and browning: Maillard reactions require heat and relatively low surface moisture. Patting dry and adding starch speeds up surface dehydration and enhances browning.
- Short time at high heat: Moisture loss is time-dependent. A quick cook reduces the time water has to escape.
This combination—internal seasoning + surface engineering + time/temperature control—is why the method works across stovetop, oven, and air fryer.
Core recipe: Juicy thin chicken cutlets (template)
Use this template and then apply any flavor variation.
Ingredients (serves 2–4)
- 4 thin chicken breast cutlets (about 1–1.5 lb / 450–680 g total)
- Quick brine: 4 cups water + 3 tbsp kosher salt
- 2–4 teaspoons cornstarch (or potato starch/rice flour)
- 1–2 tablespoons neutral oil
- Black pepper
- Optional: butter, lemon, herbs for finishing
Steps
- Brine: 15–30 minutes in the refrigerator.
- Dry: drain and pat very dry.
- Dust: lightly coat with starch; season with pepper.
- Flash sear: hot skillet, 1–3 minutes per side depending on thickness (see chart), until 160–162°F.
- Rest: 3 minutes.
- Finish: sauce, squeeze of lemon, or a drizzle of olive oil.
Weeknight menu ideas (pairings that fit the timing)
Thin cutlets cook so fast that your sides should be equally fast or hands-off:
- Bagged salad + quick vinaigrette (olive oil + lemon + Dijon)
- Microwave or quick-boil grains (couscous is especially fast)
- Sheet-pan vegetables started while chicken brines
- Garlic sautéed greens (spinach, kale, broccolini)
A great rhythm: start vegetables first, brine chicken while they cook, then flash sear the cutlets right before serving.
Final takeaways (so you can cook by instinct)
- Thin chicken dries out because it overcooks quickly; your solution is insurance + speed + precision.
- Brine 15–30 minutes for seasoning and moisture.
- Pat dry and dust lightly with starch for browning and a protective surface.
- Flash sear and pull at 160–162°F, then rest.
- Use the same method across stovetop, oven, and air fryer with the timing chart as your baseline.
Once you internalize this, thin-sliced chicken breast stops being a “hope it turns out” ingredient and becomes a dependable building block for fast, flavorful meals—juicy every time.