Why Okra Turns Slimy, Crisp, or Silky: Mucilage Chemistry, Acid Timing, and the Heat Rules for Stews, Sautés, and Frying
RecipeSimpli
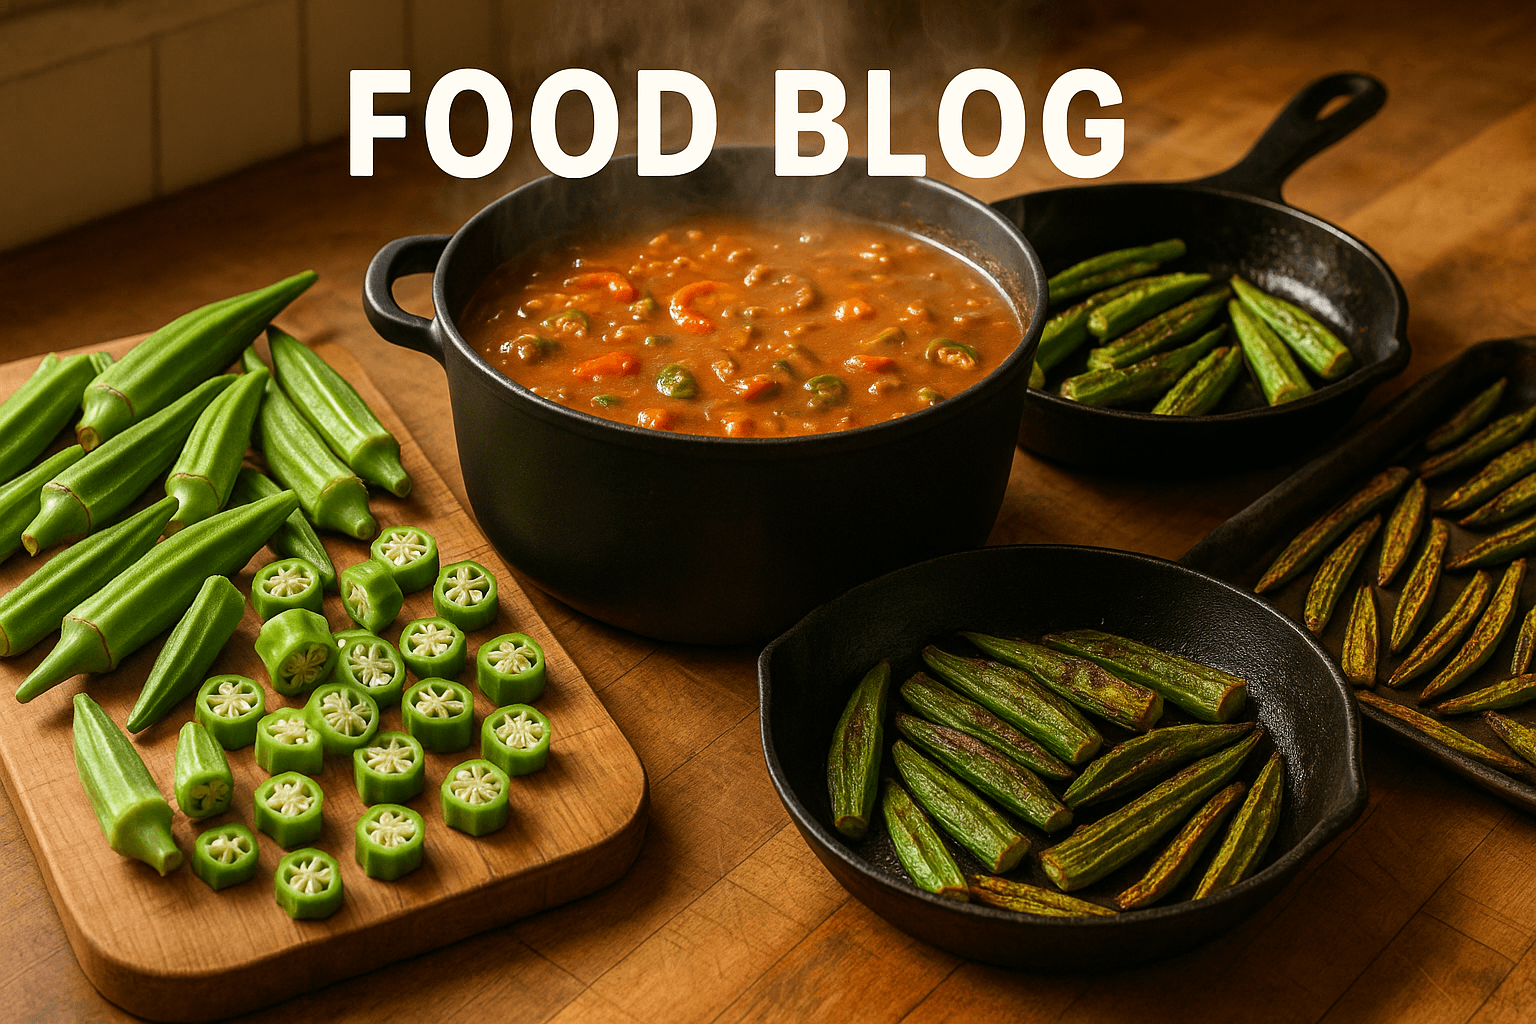
If you’ve ever cooked okra, you already know it can behave like three different vegetables depending on what you do to it. Treated one way, it leaks a slippery gel that stretches from knife to cutting board and turns a stew glossy and thick. Treated another, it browns at the edges, stays almost dry, and eats like a green bean with better personality. Push it in a third direction and it becomes something in between: not slimy, not crisp, but silky—lush enough to enrich a pot, delicate enough to feel intentional rather than messy.
That range is exactly what makes okra so interesting. Its famous “slime” is not kitchen failure. It is chemistry. More specifically, it is mucilage: a group of water-loving polysaccharides stored in the pods. Whether that mucilage feels unpleasantly slippery, beautifully velvety, or nearly absent depends on a handful of controllable variables: how fresh the okra is, how you cut it, how wet it is, when you add acid, and above all how you apply heat.
The folklore around okra is enormous. People swear by soaking it in vinegar, leaving it whole, only cooking it in cast iron, never salting it early, always salting it early, frying it first, or adding tomatoes at the start. Some of those habits work sometimes. Some work for reasons different from the stories attached to them. And some are useful only for one style of dish while actively hurting another.
So let’s strip it down and rebuild a practical, science-first model for cooking okra at home. If you understand what mucilage is and how heat, acid, moisture, and surface area change its behavior, you can choose your texture on purpose. That means better gumbo, better bhindi, better roasted okra, better fried okra, and fewer disappointing pans of green slime.
Okra’s place in the kitchen, and why slime became the whole conversation
Okra is widely associated in the United States with Southern cooking, especially gumbo, stewed okra and tomatoes, and cornmeal-fried okra. But its culinary story is much larger. Okra likely has origins in Northeast Africa and has deep roots across African cuisines. It traveled through trade and migration into the Middle East, South Asia, the Caribbean, and the Americas. Across those food traditions, cooks learned to use okra in very different ways: as a thickener, a vegetable for dry stir-fries and sautés, a component in braises, a stew ingredient, a pickle, and even a crisp fried snack.
That cultural breadth matters because it reveals a basic truth: there is no single “correct” okra texture. In some dishes, its mucilage is the point. In others, it is the obstacle. A Louisiana gumbo may welcome okra’s body, while a North Indian bhindi masala aims for distinct pieces with minimal slipperiness. In a tomatoey West African soup, mucilage can contribute luxurious viscosity; in roasted sheet-pan okra, the goal is concentrated flavor and browned edges.
Once you stop treating slime as a defect and instead as a texture with specific causes, okra becomes easier to master.
What okra slime actually is
Okra mucilage is made largely of complex carbohydrates—polysaccharides—that bind water and form a viscous gel. Think of it as a plant hydrocolloid: a natural thickener not unlike the family of substances that includes pectin, though with different structure and behavior. Inside the pod, mucilage helps with water storage and seed development. In the kitchen, once the pod is cut or heated in moisture, that material can move out of the cells and into the surrounding liquid.
A few practical consequences follow from that:
- More cut surfaces = more mucilage release. Thin rounds release more than large chunks, and both release more than whole pods.
- More available water = easier dispersion. Wet cooking encourages the mucilage to dissolve and spread.
- Agitation increases release. Stirring and tossing can mechanically encourage gel release, especially early in cooking.
- Heat changes texture direction. High, dry heat can evaporate moisture faster than mucilage disperses, while lower, wetter cooking helps it flow into the dish.
- Acid changes the feel and thickening behavior. Acid can reduce perceived slipperiness in some contexts, but it can also interfere with the kind of thickening you may actually want in a stew.
This is why okra can be dry and crisp in one pan and slippery in another with the same ingredient.
Freshness, variety, and size: why one batch of okra behaves differently from another
Before technique even begins, your okra is already carrying some texture destiny.
Variety differences
Not every okra pod contains the same amount of mucilage, nor do all pods have the same wall thickness or seed maturity. Red okra varieties often cook similarly to green ones, though anthocyanin pigments fade with heat. Longer ribbed heirloom pods can be more fibrous if harvested late. Compact, younger pods are usually more tender and easier to cook cleanly.
There is no perfect universal ranking of sliminess by variety because growing conditions matter so much, but home cooks often notice that:
- Young, small pods tend to be more tender and easier to sauté or roast successfully.
- Larger, mature pods may be woodier, seedier, and more mucilage-heavy once cut.
- Very fresh market okra often has a cleaner grassy flavor and tighter texture than older supermarket okra.
If your goal is dry sautéed or roasted okra, choose pods about 2 to 4 inches long (5 to 10 cm) when possible. For stews, larger pods can still work if trimmed and cooked longer.
Storage effects
Okra is sensitive to cold damage and dehydration. In a home refrigerator, it tends to lose freshness fast. Over time, pods can become limp, spotted, or fibrous. Some moisture loss can make the exterior feel drier, but aging doesn’t reliably mean less slime in the pan. In fact, older okra may cook worse overall because texture declines unevenly.
Best practice:
- Store okra dry and unwashed in a loosely closed bag or container lined with paper towel.
- Keep it in the refrigerator’s warmer zone if possible, around 45 to 50°F / 7 to 10°C if your setup allows; most home fridges are colder, so use it quickly.
- Aim to cook within 2 to 4 days of purchase.
Do not wash okra before storage. Extra surface moisture encourages spoilage and sets you up for wetter cooking later.
How to judge good pods
Choose pods that are:
- bright and taut
- free of dark wet spots
- not flabby or rubbery
- small to medium for most dry-heat cooking
- flexible enough to bend slightly, but not leathery
A common market test is snapping the tip. If it snaps cleanly, the pod is likely tender. If it bends and strings, it may be old or fibrous.
The biggest lever: cutting shape and surface area
If there is one factor that most clearly predicts slime release, it is surface area.
Every cut exposes interior cells and mucilage-bearing tissues. Slice okra into many thin rounds and you create dozens of little openings from which gel can emerge. Leave it whole and you trap most of that material inside unless prolonged cooking ruptures the pod.
What different cuts do
Whole pods
- Least mucilage release initially
- Best for roasting, blistering, grilling, and some braises
- Ideal when you want minimal slime and intact structure
Halved lengthwise
- Moderate release
- More browning surface than whole pods
- Good compromise for roasting and hot skillet cooking
Large diagonal pieces, about 1 inch / 2.5 cm
- Moderate to high release depending on cooking method
- Good for stews when you want thickening but still recognizable pieces
Thin rounds, 1/4 to 1/2 inch / 6 to 12 mm
- Highest release
- Best for gumbo, stews, and dishes where thickening is welcome
- Most likely to become slippery if cooked in a shallow pan with too little heat
This is why advice like “leave okra whole to reduce slime” works—but only for dishes where whole okra makes culinary sense. It is not magic; it is geometry.
The water rule: dry surfaces give you options
There are two kinds of moisture to think about with okra: surface water and internal water.
Surface water is under your control. Internal water is part of the vegetable.
Surface water matters because it delays browning and creates steam. Steam softens tissue and helps mucilage move out into the pan. So if your goal is a dry sauté or roast, washing and then casually draining okra is not enough.
For low-slime cooking:
- Wash the okra.
- Dry it thoroughly with towels.
- Let it air-dry for 15 to 30 minutes if possible before cutting.
- Cut only when dry.
That little rest period helps more than people expect. Water clinging to the outside of the pods is often the difference between quick blistering and steamy exudation.
If your goal is stew thickening, this matters less. In that context, some released mucilage is useful.
The acid question: when it helps, when it hurts
Acid is one of the most misunderstood tools in okra cookery.
People often say to add vinegar, lemon juice, or tomatoes to “cut the slime.” Sometimes that seems true. But the timing and context are everything.
What acid does
Acid can change the way plant polysaccharides behave in water and can alter the perception of slipperiness on the palate. In practical cooking terms, acid often seems to:
- reduce the sensation of loose, stringy slime
- firm plant tissues somewhat during early cooking
- brighten flavor
- limit the kind of free-flowing mucilage that makes a pan feel gooey
But there is a tradeoff.
Why acid can hurt thickening
If you’re making a stew or gumbo and want okra to contribute body, acid added too early may reduce the thick, cohesive viscosity you’re trying to build. It can make the liquid feel thinner or prevent the mucilage from integrating in the way you want. That does not mean “never add tomatoes.” It means decide whether okra is acting as a vegetable, a thickener, or both.
Practical acid timing rules
For dry sautéed, roasted, or stir-fried okra
Add acid late or use a very brief pre-treatment.
Two good options:
- Toss sliced okra with 1 teaspoon vinegar per pound / 450 g, rest 10 minutes, then dry lightly and cook.
- Cook the okra first over high heat, then add tomatoes, tamarind, lemon juice, or yogurt near the end.
This works because you first drive off moisture and develop browning, then use acid for flavor without inviting a long wet simmer.
For gumbo and stews where thickening is desired
Add major acidic ingredients after the okra has cooked enough to release body, or balance the dish knowing tomatoes may reduce some thickening power.
For example:
- Brown or sauté sliced okra first.
- Simmer it in stock for 20 to 30 minutes to develop body.
- Add tomatoes or other acids later if you want the okra to thicken first.
For tomato-okra dishes where some slipperiness is acceptable or desirable
Add tomatoes once the okra has had a chance to sear or sauté, not into a cold crowded pan.
In other words, acid is not an anti-slime on/off switch. It is a texture-direction tool.
The heat rules that explain almost everything
If surface area is the first big lever, heat is the second.
The behavior of okra in the pan is largely a race between three things:
- Moisture release from the vegetable
- Mucilage dispersal into that moisture
- Evaporation and browning driven by heat
Who wins that race determines whether your okra is slimy, silky, or crisp.
Rule 1: High dry heat minimizes slime perception
When okra hits a hot surface with enough fat and enough room, moisture evaporates quickly. Browning begins before the vegetable can stew in its own juices. Mucilage may still emerge, but it gets concentrated, toasted, or held to the surface rather than turning the whole pan slick.
Use this for:
- dry sautés
- skillet blistering
- roasting
- air frying
- shallow frying
- deep frying
Target temperatures:
- skillet surface: very hot, with oil shimmering but not smoking heavily
- oven roasting: 425 to 450°F / 220 to 230°C
- deep frying: 350 to 375°F / 175 to 190°C
Rule 2: Moderate wet heat encourages silkiness and thickening
In soups and stews, that same mucilage disperses into water and becomes an asset. Given time, it can move from raw stringiness to smooth body.
Use this for:
- gumbo
- stewed okra
- soups
- braised tomato-okra dishes
Target temperatures:
- simmer, not a violent boil: around 185 to 205°F / 85 to 96°C in the pot
A hard boil can break up the okra too aggressively and make the liquid feel ragged instead of velvety.
Rule 3: Crowding causes slime
Even a hot pan fails if overloaded. Too much okra drops the pan temperature and traps steam. Instead of searing, the pieces sweat. Sweat plus exposed cut surfaces equals slime.
For a 12-inch / 30-cm skillet, cook no more than about 8 to 10 ounces / 225 to 280 g sliced okra at a time if you want aggressive browning. For whole or halved pods, you may fit 10 to 12 ounces / 280 to 340 g in a single layer.
Rule 4: Stir less at the beginning
Frequent stirring breaks open more surfaces and smears released mucilage around the pan before evaporation gets ahead. Let okra sit in contact with the heat for 1 to 2 minutes at a time before tossing.
Rule 5: Oil helps, but it is not a cure-all
Fat coats surfaces, encourages browning, and improves mouthfeel. But too little heat with plenty of oil just gives you oily slime. Oil supports the method; it cannot replace the method.
Step-by-step: how to make okra silky in stew or gumbo
If your goal is body rather than dryness, you want controlled mucilage release.
Method for a silky okra base
Ingredients
- 1 pound / 450 g okra, sliced into 1/2-inch / 12-mm rounds
- 2 tablespoons neutral oil or rendered fat
- 1 medium onion, diced
- 2 cloves garlic, minced
- 4 cups / 950 ml stock
- 1 teaspoon kosher salt, plus more to taste
- optional: cayenne, black pepper, thyme, bay leaf
- optional acid later: 1 to 2 teaspoons vinegar or 1 cup chopped tomatoes
Method
- Heat a heavy pot over medium-high heat and add the oil.
- Add the sliced okra in a relatively even layer. Cook for 5 to 8 minutes, stirring occasionally, until the initial tackiness decreases and the okra darkens slightly.
- Add onion and cook 4 to 5 minutes more until softened.
- Add garlic and spices; cook 30 seconds.
- Add stock and salt. Bring just to a boil, then lower to a gentle simmer.
- Simmer uncovered 20 to 30 minutes, stirring occasionally, until the liquid takes on a lightly thickened, glossy consistency.
- Add acidic ingredients only after body has developed if you want maximum thickening.
At first, the pot may look ropey or stringy. That is normal. Given enough time in the correct amount of liquid, the texture often shifts from raw slime to integrated viscosity.
Common mistake
Adding tomatoes at the start to a pot where you want okra to thicken strongly. You can still make a delicious dish that way, but the texture tends to be brighter and looser, less lush.
Step-by-step: how to sauté okra so it stays mostly dry
This is the method for people who claim they hate okra and then suddenly love it.
High-heat dry sauté method
Ingredients
- 1 pound / 450 g okra, thoroughly dried
- 1 1/2 tablespoons high-heat oil
- 3/4 teaspoon kosher salt
- 1/2 teaspoon ground coriander or cumin (optional)
- 1 small shallot or 1/4 onion, thinly sliced (optional)
- 1 teaspoon lemon juice or 1 teaspoon vinegar, added at the end
Method
- Wash and dry the okra very well. Let it air-dry 15 to 30 minutes.
- Trim stem ends without deeply cutting into the pod. Slice into lengthwise halves or thick diagonals.
- Heat a wide skillet over medium-high to high heat for 2 to 3 minutes. Add oil.
- Add okra in a single layer. Do not crowd. Cook in batches if needed.
- Leave undisturbed for 2 minutes.
- Toss or flip. Cook another 4 to 6 minutes, tossing only occasionally, until edges blister and moisture cooks off.
- Add salt toward the middle or end of cooking rather than right at the start if your pan tends to steam; in a truly hot pan, early salting is less of a problem, but delayed salting gives you a margin of safety.
- Add shallot only once okra is already losing its tackiness, so the onion does not release too much water too early.
- Finish with lemon juice or vinegar off the heat or in the last 30 seconds.
The result should not be cracker-crisp, but it should be dry on the surface, lightly browned, and free of pooled slime.
Common mistakes
- Crowding the skillet
- Starting with wet okra
- Cutting into thin rounds
- Using medium heat and stirring constantly
- Adding onions or tomatoes too early
Step-by-step: roasting okra for browned edges and concentrated flavor
Roasting gives okra some of the best texture payoff for the least effort.
Oven-roasted okra
Ingredients
- 1 pound / 450 g small okra pods
- 1 to 1 1/2 tablespoons oil
- 3/4 teaspoon kosher salt
- 1/4 teaspoon black pepper
- optional: 1/2 teaspoon smoked paprika, cumin, or chaat masala
Method
- Heat oven to 450°F / 230°C.
- Wash, dry, and, ideally, air-dry the okra.
- Leave small pods whole, or halve lengthwise.
- Toss with oil, salt, and spices.
- Arrange on a preheated sheet pan or standard sheet pan in a single layer with space between pieces.
- Roast 12 to 18 minutes, shaking once halfway, until browned at edges and tender.
- Finish with lemon zest, a squeeze of lemon, or a sprinkle of toasted sesame.
Why it works: the oven provides broad, dry heat that steadily evaporates moisture while allowing browning. Whole or halved pods protect the interior from excessive mucilage release.
Step-by-step: frying okra for crunch
Frying combines two anti-slime advantages: protective coating and rapid high heat.
Southern-style fried okra
Ingredients
- 1 pound / 450 g okra, sliced into 1/2-inch / 12-mm rounds
- 1/2 cup / 120 ml buttermilk or 1 beaten egg plus 2 tablespoons milk
- 3/4 cup / 90 g cornmeal
- 1/4 cup / 30 g flour
- 1 teaspoon kosher salt
- 1/2 teaspoon black pepper
- 1/2 teaspoon paprika or cayenne
- oil for frying
Method
- Pat sliced okra dry.
- Toss with buttermilk and let sit 5 minutes.
- Mix cornmeal, flour, salt, and spices.
- Dredge okra, shaking off excess.
- Fry at 360°F / 182°C for 2 to 4 minutes until golden and crisp.
- Drain on a rack, not paper towels alone, to preserve crispness.
The coating absorbs surface mucilage, creates texture, and shields the vegetable while intense heat drives out moisture.
Common mistake
Frying too cool. At 325°F / 163°C, coated okra absorbs oil faster than it crisps and can turn greasy and soft.
Gumbo-specific texture strategy
Gumbo deserves its own section because okra is often asked to do two jobs there: contribute flavor and contribute body.
There are several legitimate approaches:
1. Okra as thickener
Slice okra and cook it long enough in the liquid to release mucilage. This gives a more pronounced okra presence and glossy body.
2. Okra pre-cooked to tame raw slime, then added
Some cooks roast, sauté, or oven-dry okra before adding it to gumbo. This moderates its most overt sliminess while preserving flavor.
3. Combined thickening system
Use roux for foundational body and okra for a more elastic, glossy viscosity. Filé powder may be added at serving or after cooking, depending on style, but not usually boiled hard.
A smart home-cook strategy:
- Brown the okra separately in a skillet for 8 to 10 minutes.
- Add it to the gumbo after the roux-and-stock base is established.
- Simmer 25 to 35 minutes to integrate.
This avoids the raw ropey phase while still letting okra enrich the pot.
Salting, folklore, and what actually matters
Salt gets blamed for all kinds of vegetable behavior. With okra, the truth is nuanced.
Salt can draw some moisture outward through osmosis, especially if applied well in advance. In a marginally hot pan, that extra surface moisture can worsen steaming. But salt is rarely the main problem. Wet okra, too much cutting, crowding, and insufficient heat are bigger issues.
So:
- For dry sautéing, salt midway or near the end if you want insurance against steaming.
- For roasting, salting at the start is usually fine because the oven environment is dry and spacious.
- For stews, salt normally.
As for other bits of folklore:
“Only cook okra whole.”
Helpful for some methods, limiting for others. Whole pods reduce slime because they reduce exposed surface area.
“Vinegar removes slime.”
Not exactly. It changes the texture environment and can reduce perceived slickness, especially with good heat management.
“Cast iron fixes okra.”
Cast iron helps because it stores heat well, which supports browning. The material is less important than sustained high heat and sufficient pan space.
“Never stir okra.”
Too absolute. Stir less at first when dry-cooking. Stir normally in stew once the texture direction is established.
How to choose the right technique for the texture you want
Here is the simplest practical map.
If you want crisp or dry-tender okra
Use:
- whole or halved pods
- high heat
- ample pan space
- minimal early stirring
- little to no added water
- acid late
Best methods:
- roasting at 425 to 450°F / 220 to 230°C
- skillet blistering over high heat
- air frying around 400°F / 205°C
- deep frying at 350 to 375°F / 175 to 190°C
If you want silky, glossy okra
Use:
- sliced okra
- enough liquid to disperse mucilage
- moderate simmering time
- acid after the body develops
Best methods:
- stew
- gumbo
- braise
- soup
If you want something in between
Use:
- larger pieces or lengthwise halves
- initial high-heat sauté
- then a short covered finish or brief addition of tomatoes
That hybrid approach gives tenderness without excessive slickness.
Three reliable home formulas
1. Minimal-slime weeknight okra skillet
- 1 pound / 450 g halved okra
- 1 1/2 tablespoons oil
- sear over high heat 7 to 9 minutes
- salt at minute 5
- add garlic for 30 seconds
- finish with 1 teaspoon lemon juice
2. Tomato-okra with controlled texture
- sear 1 pound / 450 g sliced or halved okra first for 6 to 8 minutes
- add 1 cup / 240 ml chopped tomato and simmer 5 minutes
- season with onion, chili, and coriander
This keeps the tomatoes from turning the dish soupy before the okra is properly cooked.
3. Gumbo-style okra body builder
- sauté 1 pound / 450 g sliced okra in 2 tablespoons fat for 8 minutes
- add to 4 to 6 cups / 950 ml to 1.4 L simmering broth or gumbo base
- simmer 25 minutes before adding strong acid
Troubleshooting: what went wrong and how to fix it
Problem: The pan filled with slime almost immediately
Likely causes:
- okra was wet
- cut too thin
- pan crowded
- heat too low
Fix next time:
- dry better
- use whole or halved pods
- cook in batches
- preheat longer
In the moment:
- raise heat
- stop stirring constantly
- give moisture time to evaporate
Problem: Okra is browned but still tough
Likely cause:
- pods were too large or mature
Fix:
- choose smaller pods next time
- for current batch, add a spoonful or two of water, cover briefly 2 to 3 minutes, then uncover and cook dry again
Problem: Gumbo didn’t thicken
Likely causes:
- too little okra
- acid added too early
- cooking time too short
Fix:
- simmer longer
- mash a small portion of the okra into the broth
- add more okra next time or rely more on roux
Problem: Fried okra got soggy
Likely causes:
- oil too cool
- overcrowded fryer
- held on paper towels too long
Fix:
- fry at 360°F / 182°C in batches
- drain on a rack
- serve quickly
The science in one sentence
Okra turns slimy when exposed mucilage hydrates and disperses faster than heat can evaporate moisture; it turns crisp when high dry heat and low surface area outrun that process; and it turns silky when you intentionally let the mucilage integrate into liquid under controlled simmering.
That single idea explains most okra outcomes.
Takeaways you can actually use tonight
If you remember only a few things, remember these:
- Cutting releases slime. More cuts mean more mucilage.
- Dry okra thoroughly if you want a clean sauté or roast.
- High heat plus space is the anti-slime combo.
- Acid is about timing. Add it late for dry preparations; delay it if you want stew thickening.
- Whole or halved pods are best for roasting and blistering.
- Sliced rounds are best when you want body in soups and gumbo.
- Crowding is the enemy. Steam is what turns many okra pans from promising to slippery.
- Slime is not failure. In the right dish, it is silk.
That last point is worth holding onto. Okra is not a problem ingredient waiting to be subdued. It is a texture ingredient with unusual range. Once you stop fighting all of its natural behavior all of the time, you can start using it with intention. Roast it until it blisters. Fry it until it crunches. Simmer it until it glosses a stew like velvet. The trick is not folklore or fear. It is understanding when to expose the mucilage, when to restrain it, and when to let heat decide what kind of okra you want on the plate.